

When to use bulk enrolment and export#
- Bulk upload enrols a whole class, or a whole school, from one Excel file, instead of filling in the Enroll student form for each student (Guide 8). Every student still gets their own access code.
- Export downloads your student list as a spreadsheet, so you can print access-code slips, share lists with class teachers or keep a record.
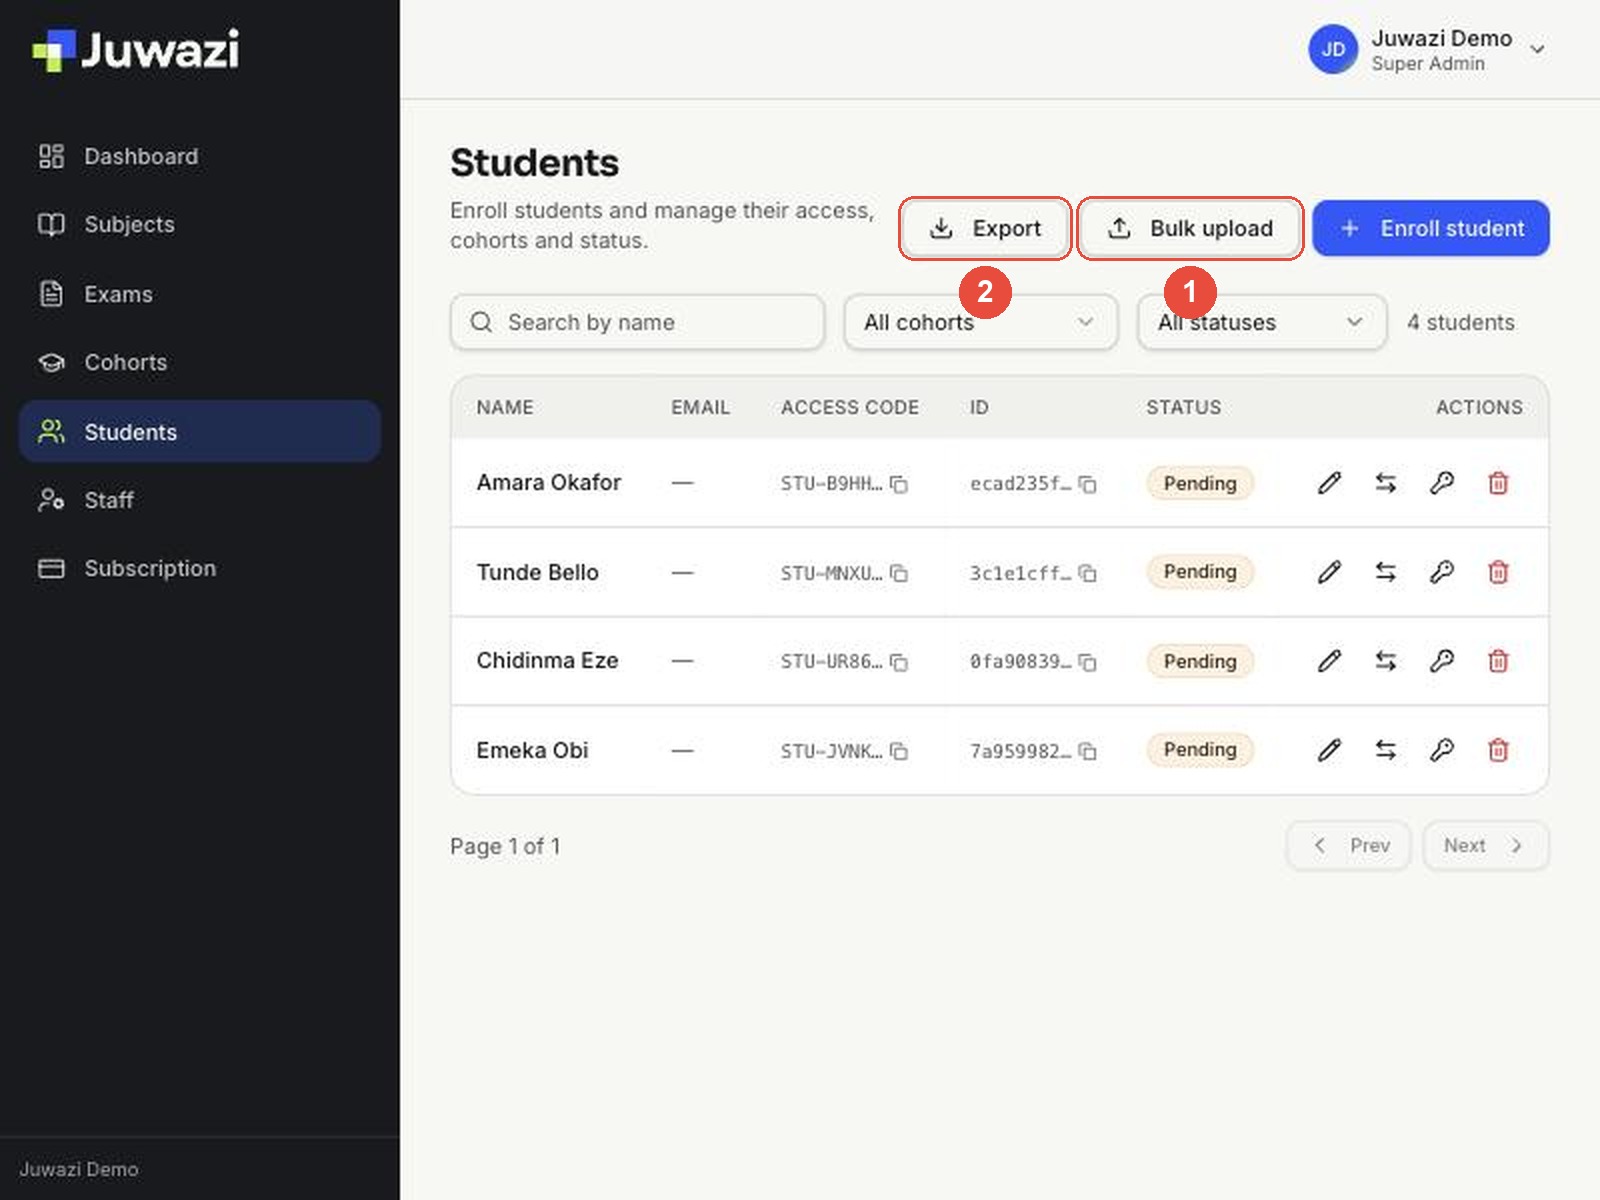
Both buttons are at the top of the Students page.
Step 1: Open Bulk upload and download the template#
- In the sidebar, click Students.
- Click Bulk upload (1). The Export button (2) is covered in Step 5.
The Bulk enroll students window opens:
- Cohort – the cohort every student in the file will join. It’s required.
- Download Excel template – the blank spreadsheet with the right columns.
- The drop area – click it to choose your file, or drag the file onto it.
- Upload – stays greyed out until you’ve chosen a cohort and a file.
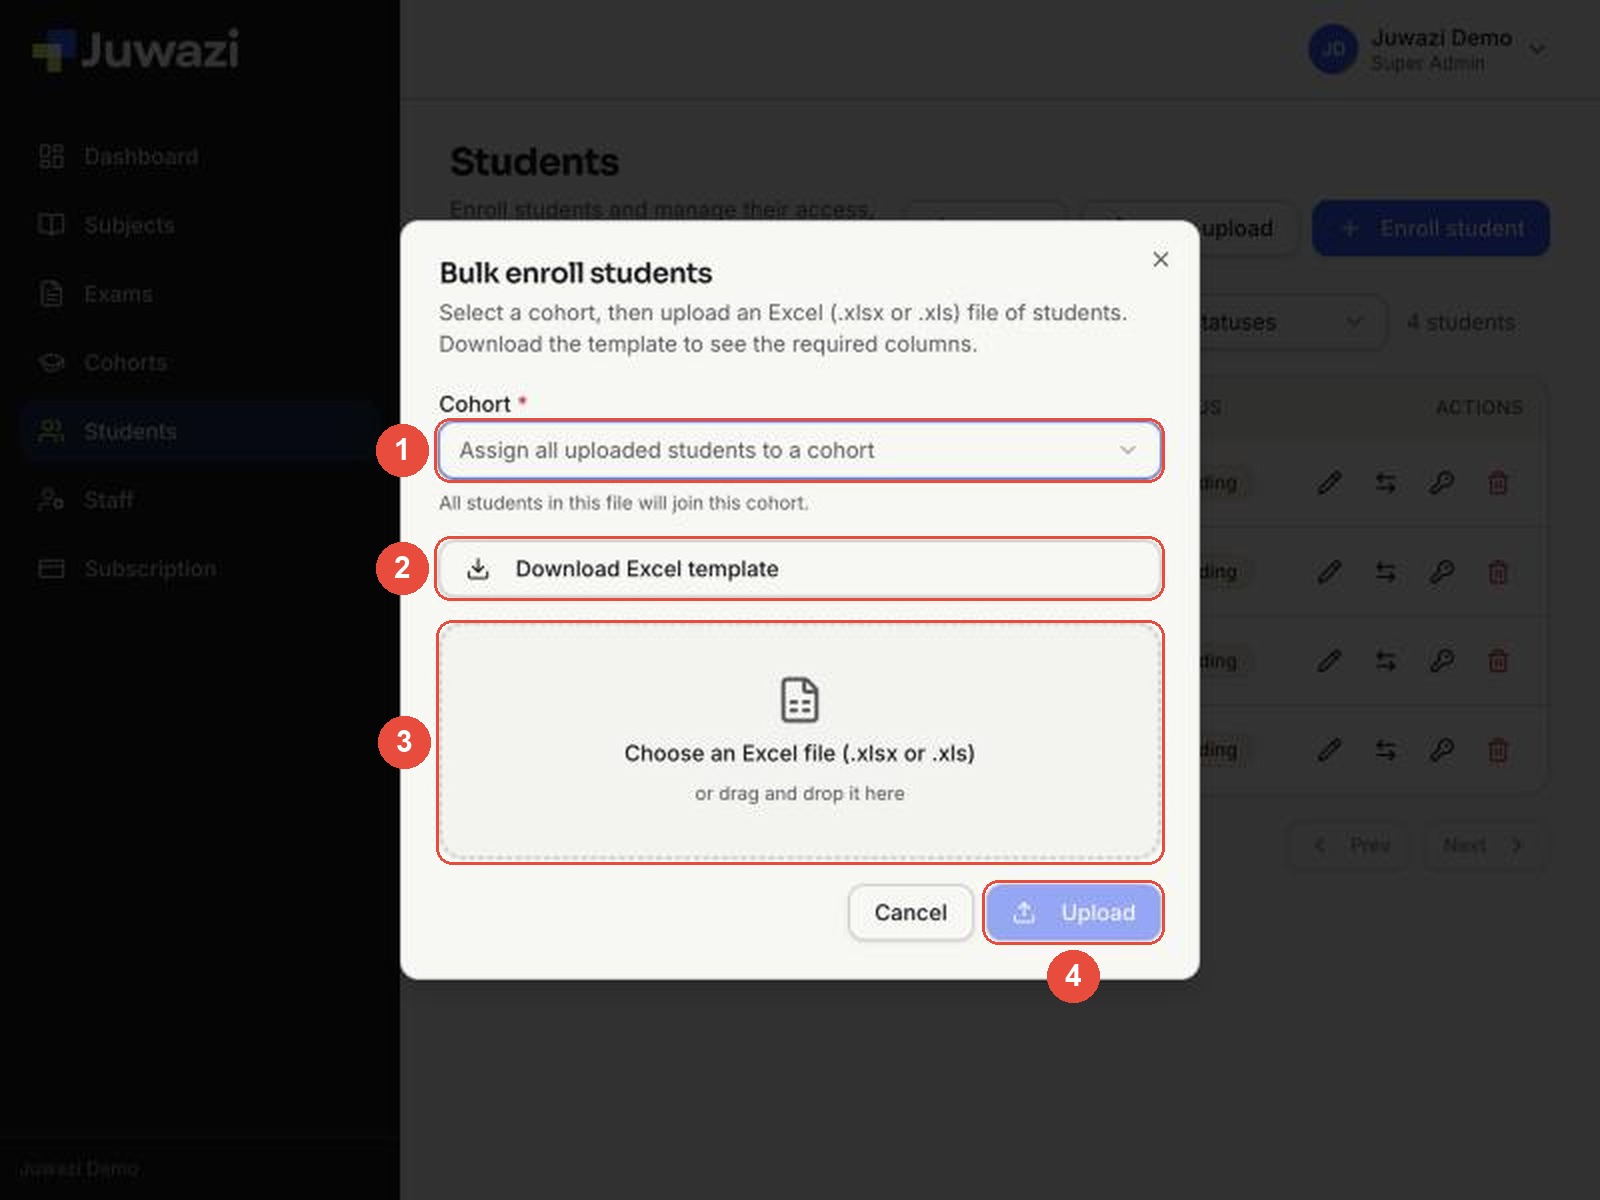
Click Download Excel template (2). The file saves to your computer’s Downloads folder. Always start from a fresh copy of the template, so the column names match exactly what Juwazi expects.
Step 2: Fill in the template#
The template has two sheets: Students, where you type your list, and Instructions, which explains each column. Keep the header row exactly as it is and add one student per row underneath.
| Column | Required? | What to enter |
|---|---|---|
| firstname | Yes | First name |
| lastname | Yes | Surname |
| othername | No | Middle or other names |
| No | The student’s email. If you fill this in, Juwazi emails the student their access code. | |
| phone | No | Phone number with the country code, e.g. +2348012345678 |
| institution_id | Yes | The Student ID or admission number. It must be unique in your organisation. |
| access_code | No | Leave blank and Juwazi creates a code (STU-XXXXXXX). Or type your own code. |
This is the file we used for SS2 Science – Class B. Four students get automatic codes and one gets a custom code:
| firstname | lastname | institution_id | access_code |
|---|---|---|---|
| Adaeze | Nwosu | JW-2026-005 | (blank) |
| Bolaji | Adewale | JW-2026-006 | (blank) |
| Fatima | Bello | JW-2026-007 | (blank) |
| Ifeanyi | Okeke | JW-2026-008 | (blank) |
| Kemi | Ogunleye | JW-2026-009 | SS2B-KEMI9 |
Things to know:
- There’s no cohort column. You pick the cohort in the upload window, and it applies to every row. To enrol several classes, make one file per class.
- Leave email blank if you don’t want codes emailed yet, for example while you’re testing or until the class is ready. You can share codes yourself later from the Students list or an export.
- Save the file as .xlsx or .xls.
Step 3: Upload the file and check the result#
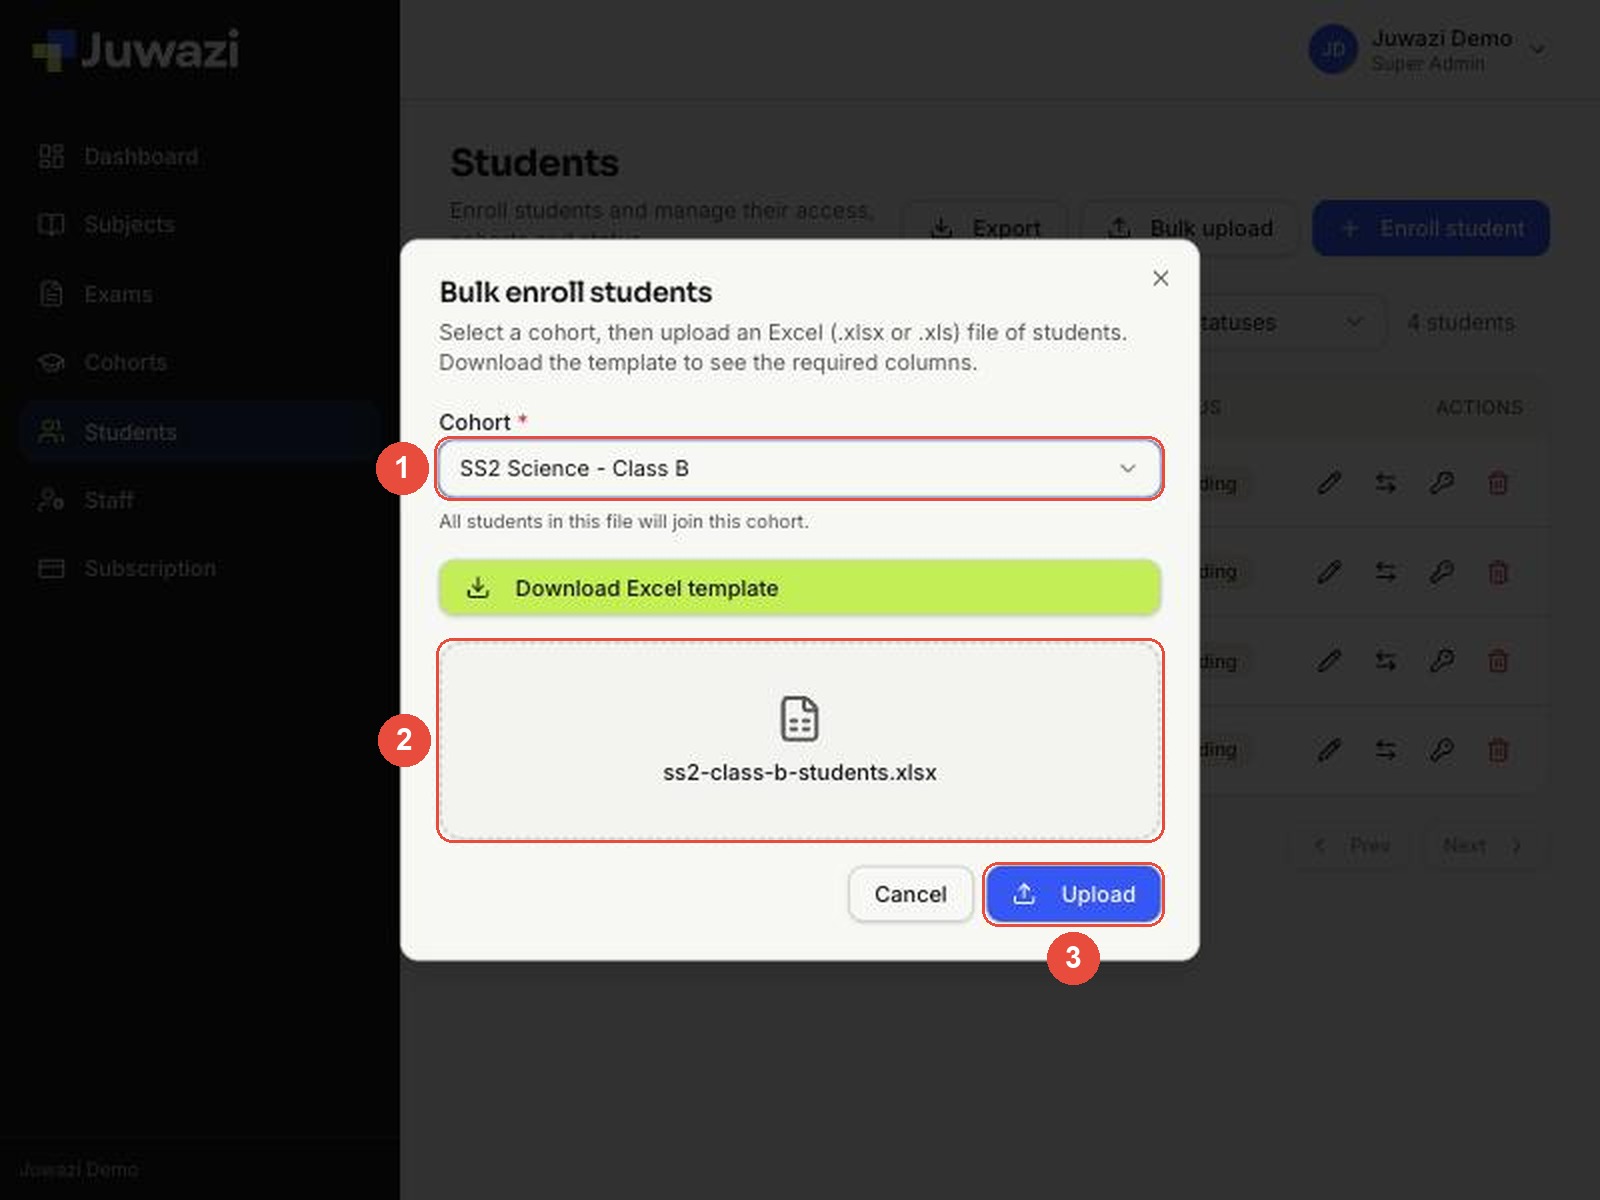
- Choose the Cohort (1), here SS2 Science – Class B.
- Click the drop area and choose your file, or drag it in (2). The file name appears.
- Click Upload (3).
After a few seconds the window shows a summary (1), here 5 imported, 5 total, and a 5 rows imported message appears at the top right (2). Click Close.
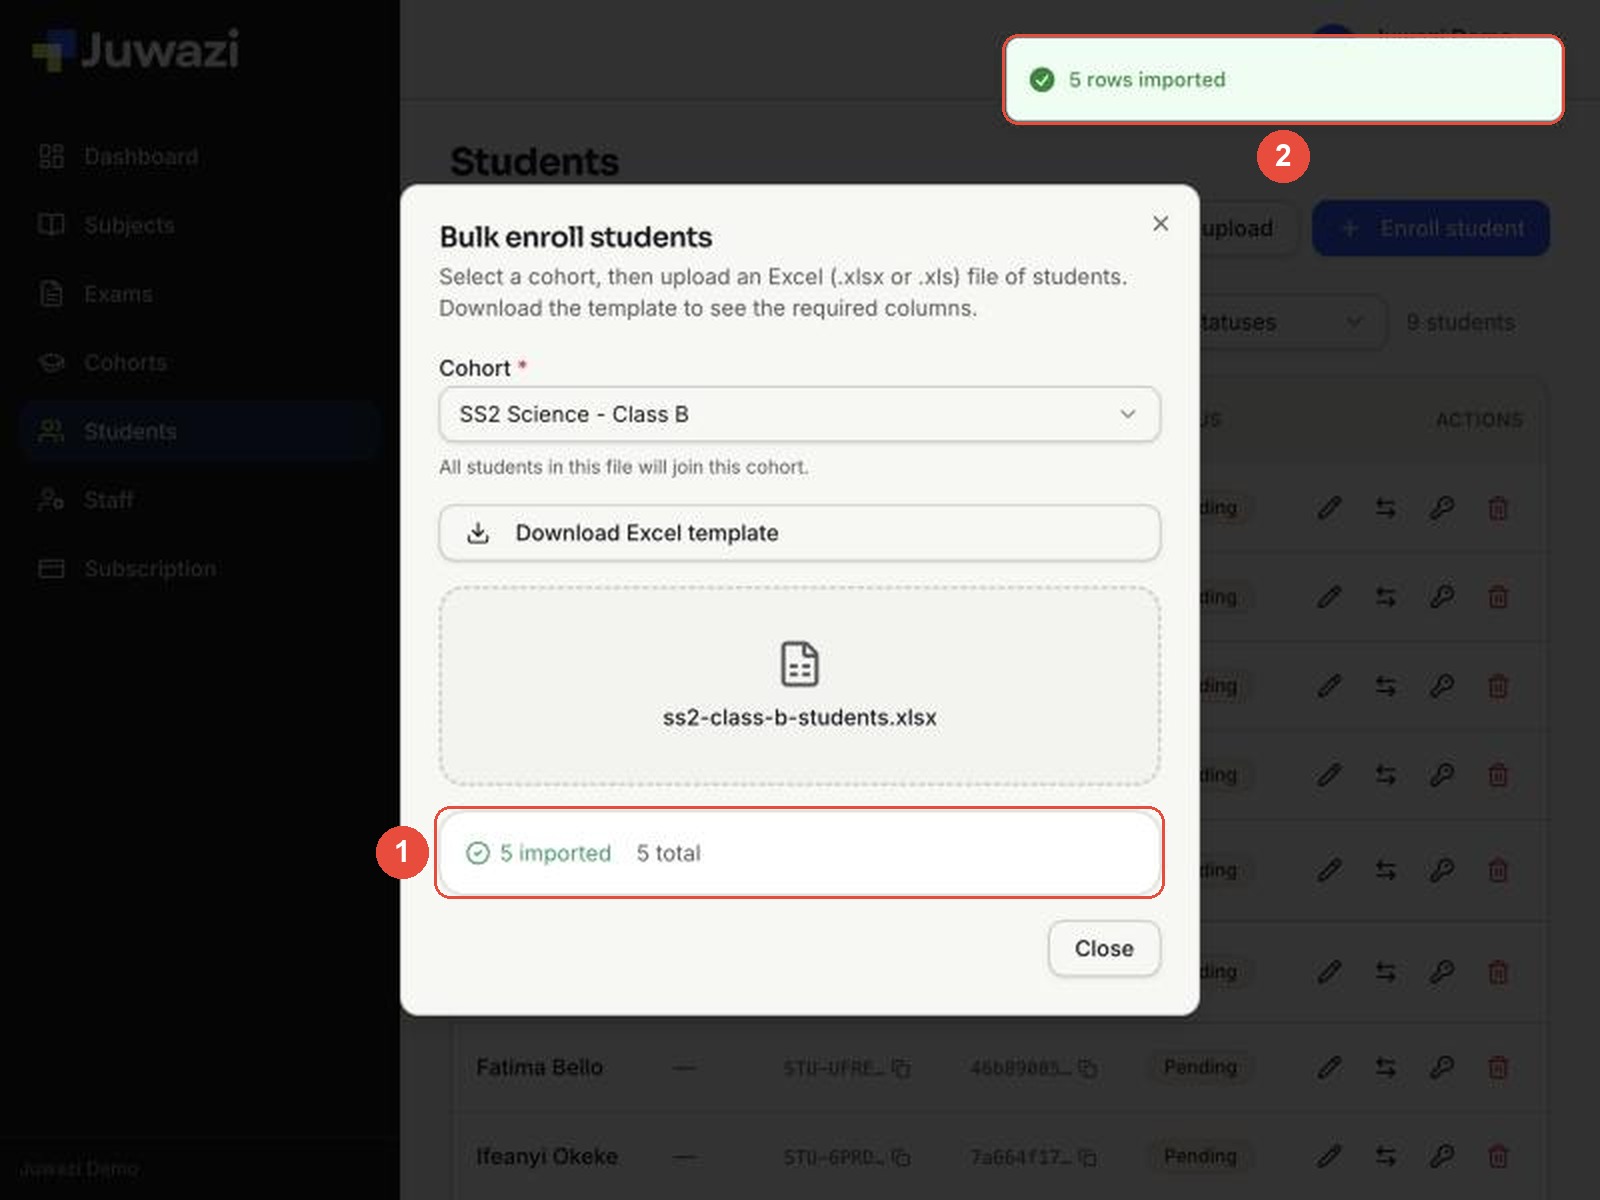
What happens next:
- The new students appear in the Students list with the status Pending. They stay Pending until each student verifies their account with their access code (Guide 8).
- They’re added to the cohort you chose, so they’ll see any exam assigned to that cohort.
- The upload summary doesn’t show access codes. To see them, use the Access code column in the Students list or download an export (Step 5).
- Custom codes are kept: Kemi’s code is SS2B-KEMI9, the code we typed in the file.
Step 4: Fix rows that fail#
Juwazi imports the good rows even when some rows have mistakes. The rows that fail are listed so you can fix them.
To show this, we uploaded a file with four rows: one correct and three with deliberate mistakes. The summary (1) shows 1 imported, 3 failed, 4 total, and the list (2) says what’s wrong with each failed row.
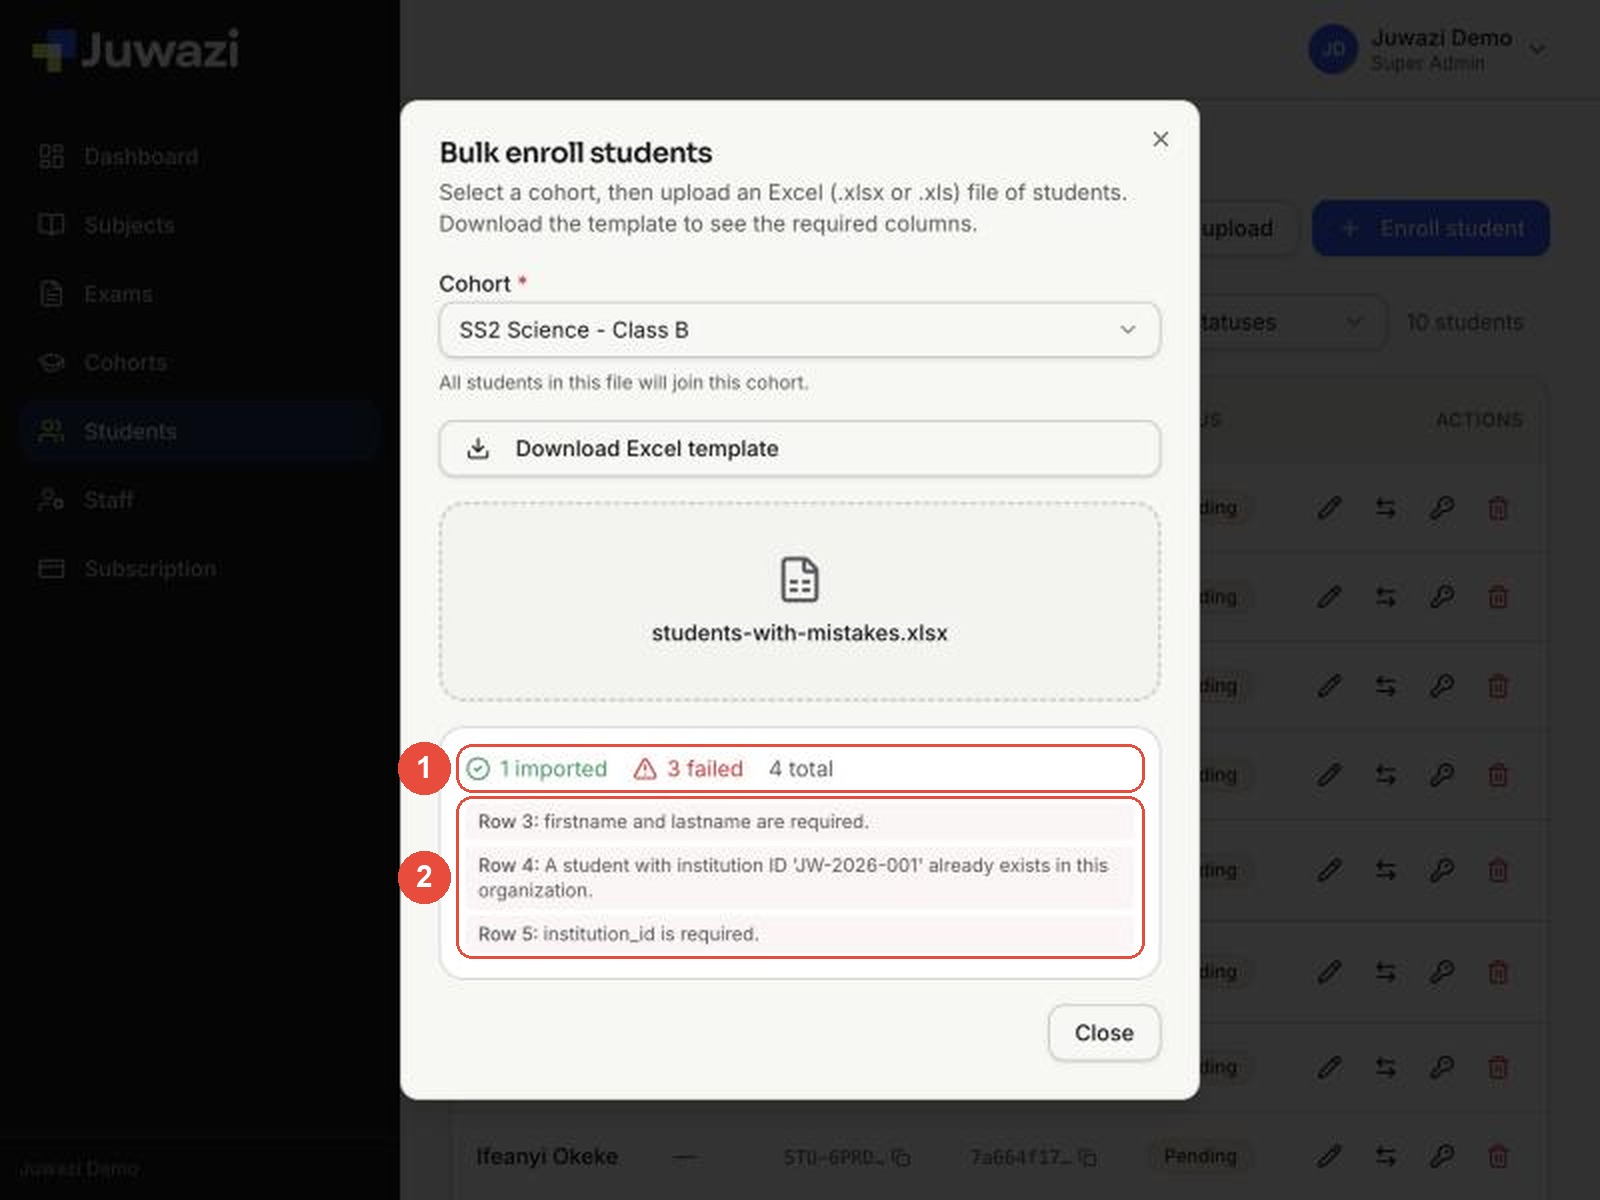
Row numbers match the rows in Excel. Row 1 is the header, so Row 3 is the second student in the file.
| Message | What it means | How to fix it |
|---|---|---|
| firstname and lastname are required. | A name is missing. | Fill in both firstname and lastname. |
| A student with institution ID ‘JW-2026-001’ already exists in this organization. | That Student ID is already used. | If it’s the same student, don’t enrol them again. Add them to the cohort instead (Guide 7). If it’s a different student, give them their correct, unique ID. |
| institution_id is required. | The Student ID is blank. | Add the student’s ID or admission number. |
To re-upload, make a copy of the file that contains only the failed rows, fix them, and upload that copy. If you re-upload the rows that already worked, they’ll fail as duplicates, because their Student IDs now exist.
Step 5: Export your students to Excel#
Export downloads the student list as an Excel file, which is useful for printing access-code slips or sharing class lists.
- To export a single class, choose it in the cohort filter (1). The list and the export both follow this filter. Leave it on All cohorts to export everyone.
- Click Export (3). The file downloads straight away; there’s no extra window.
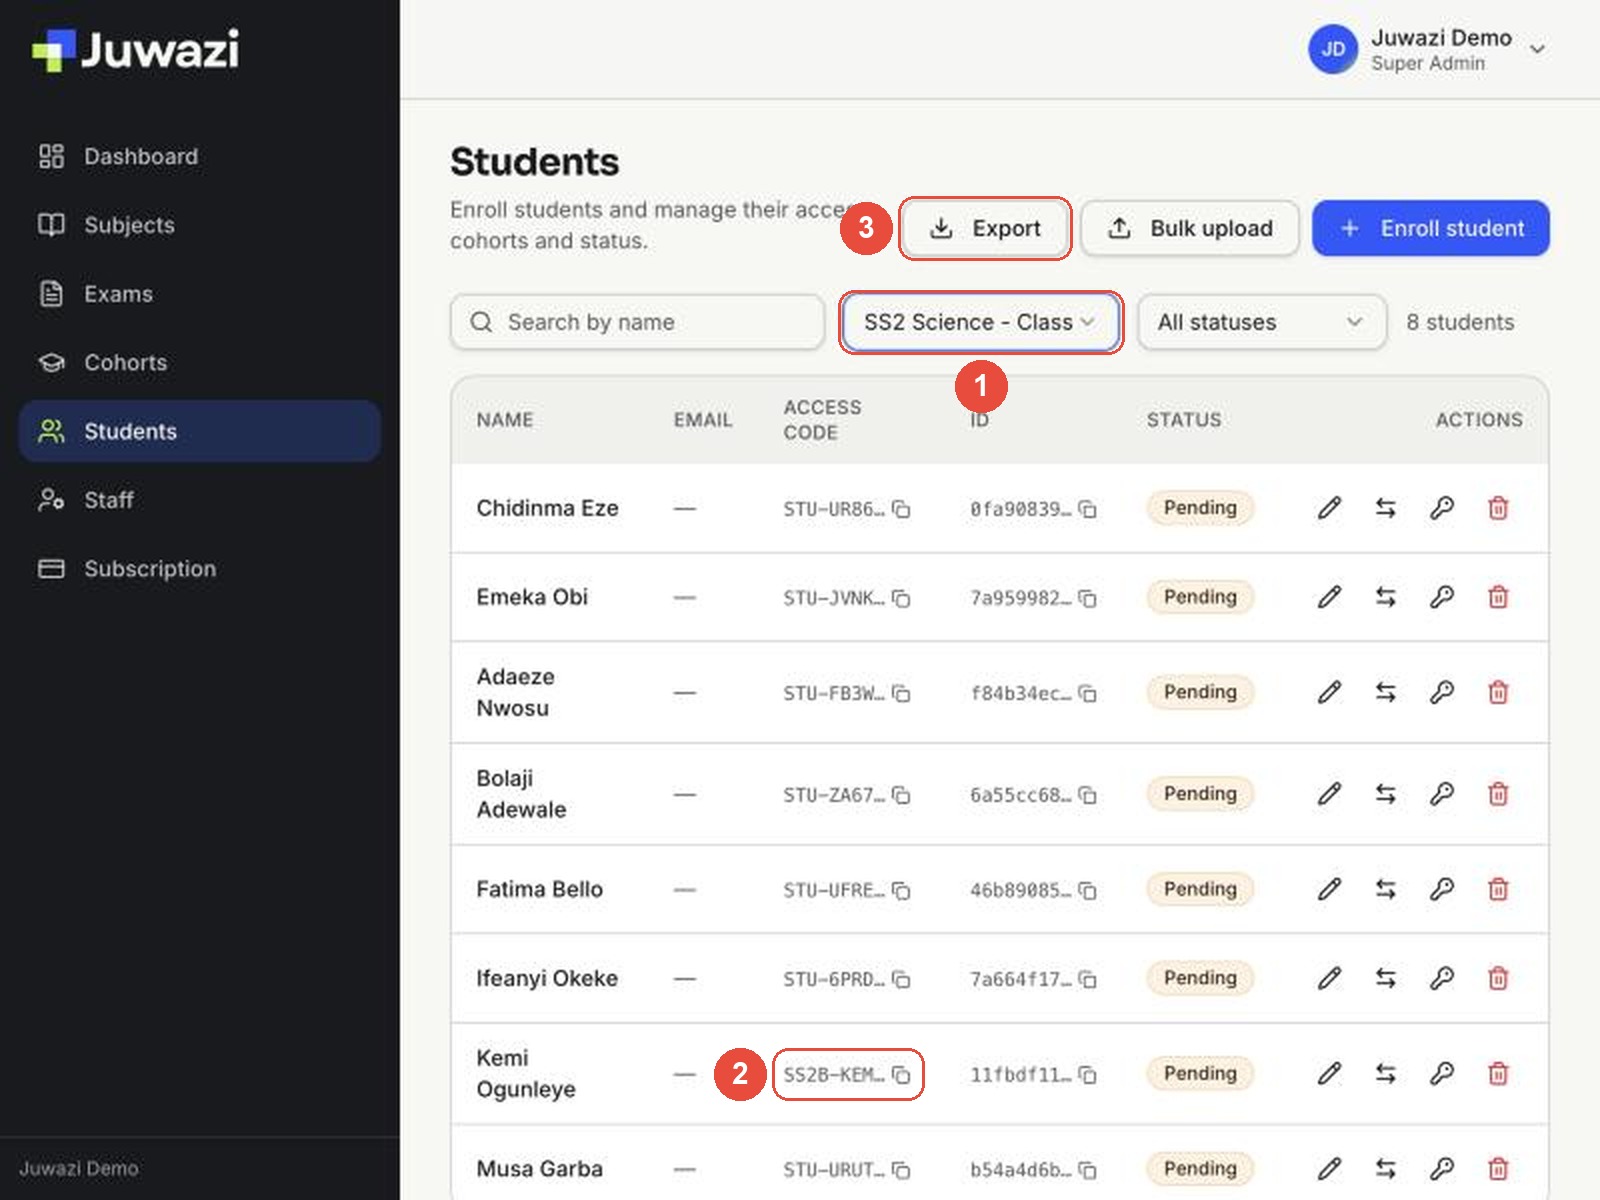
The list also shows Kemi’s custom code (2), SS2B-KEM…. Long codes are shortened on screen; the copy icon next to each code copies the full code.
The export has one sheet, Students, with these columns:
| Column | What it contains |
|---|---|
| ID | Juwazi’s internal ID for the student. You can ignore it. |
| First Name, Last Name | The student’s names |
| Registration Number | The Student ID / admission number (institution_id) |
| Blank if none was given | |
| Access Code | The full code, e.g. STU-B9HHRNW or SS2B-KEMI9 |
| Status | pending, active, archived or removed |
| Created At | When the student was enrolled |
Tips for the exported file:
- Created At shows as a number (e.g. 46310.43). In Excel, select the column and set the format to Date to see the date.
- There’s no cohort column and no phone column. Export one cohort at a time if you need a list per class.
- The file contains every student’s access code. Treat it like a password list: share it only with the people who need it, and give each student only their own code.
Tips and good practice#
- One file per cohort. The cohort is chosen in the upload window, not in the file.
- Use a consistent Student ID format, such as JW-2026-001, and check it against your school records. The ID is how Juwazi spots duplicates.
- Test with a small file first: two or three students with no email addresses. Then upload the full class.
- Double-check email addresses. Any address you include gets the student’s access code.
- Custom access codes are handy if you already have a code scheme. Keep them unique and hard to guess. Codes like 1234 are easy for other students to try.
- Export after each upload to get the full list of access codes for printing slips.
- If a student can’t sign in, check their status and code in the Students list. You can reset their security answer from the key icon (Guide 8).
Next: Guide 10, Inviting staff and assigning roles.