

Staff roles and when to invite staff#
As Super Admin you can run everything yourself, but most schools share the work. You invite each person as staff and give them a role. The role decides what they can do. Their subject and cohort assignments decide which subjects and classes they work with.
| Role | What they’re for | Subject / cohort fields when inviting |
|---|---|---|
| Administrator | Helps run the workspace. Reviews and approves exams submitted for approval. | Not shown |
| Teacher | Writes questions and builds exams for their subjects and classes. | Shown (optional) |
| Supervisor | Oversees exams for the cohorts they’re assigned to. | Not shown when inviting. Assign a cohort afterwards (Step 4). |
| Staff | Other team members who can be linked to a subject or cohort. | Shown (optional) |
Everyone you invite signs in on the normal staff sign-in page with their email and password, not with an access code like students.
In this guide we invite one person for each role into the Juwazi Demo workspace:
| Name | Role | Assigned to | |
|---|---|---|---|
| Folake Adebayo | demoadmin@juwazi.com | Administrator | — |
| Samuel Ojo | demoteacher@juwazi.com | Teacher | Mathematics, SS2 Science – Class A |
| Halima Yusuf | demosupervisor@juwazi.com | Supervisor | SS2 Science – Class A |
| Peter Nnamdi | demostaff@juwazi.com | Staff | — |
What each role sees after signing in is covered in the Administrator, Teacher, Supervisor and Staff guides.
Step 1: Open the Staff page and the invite form#
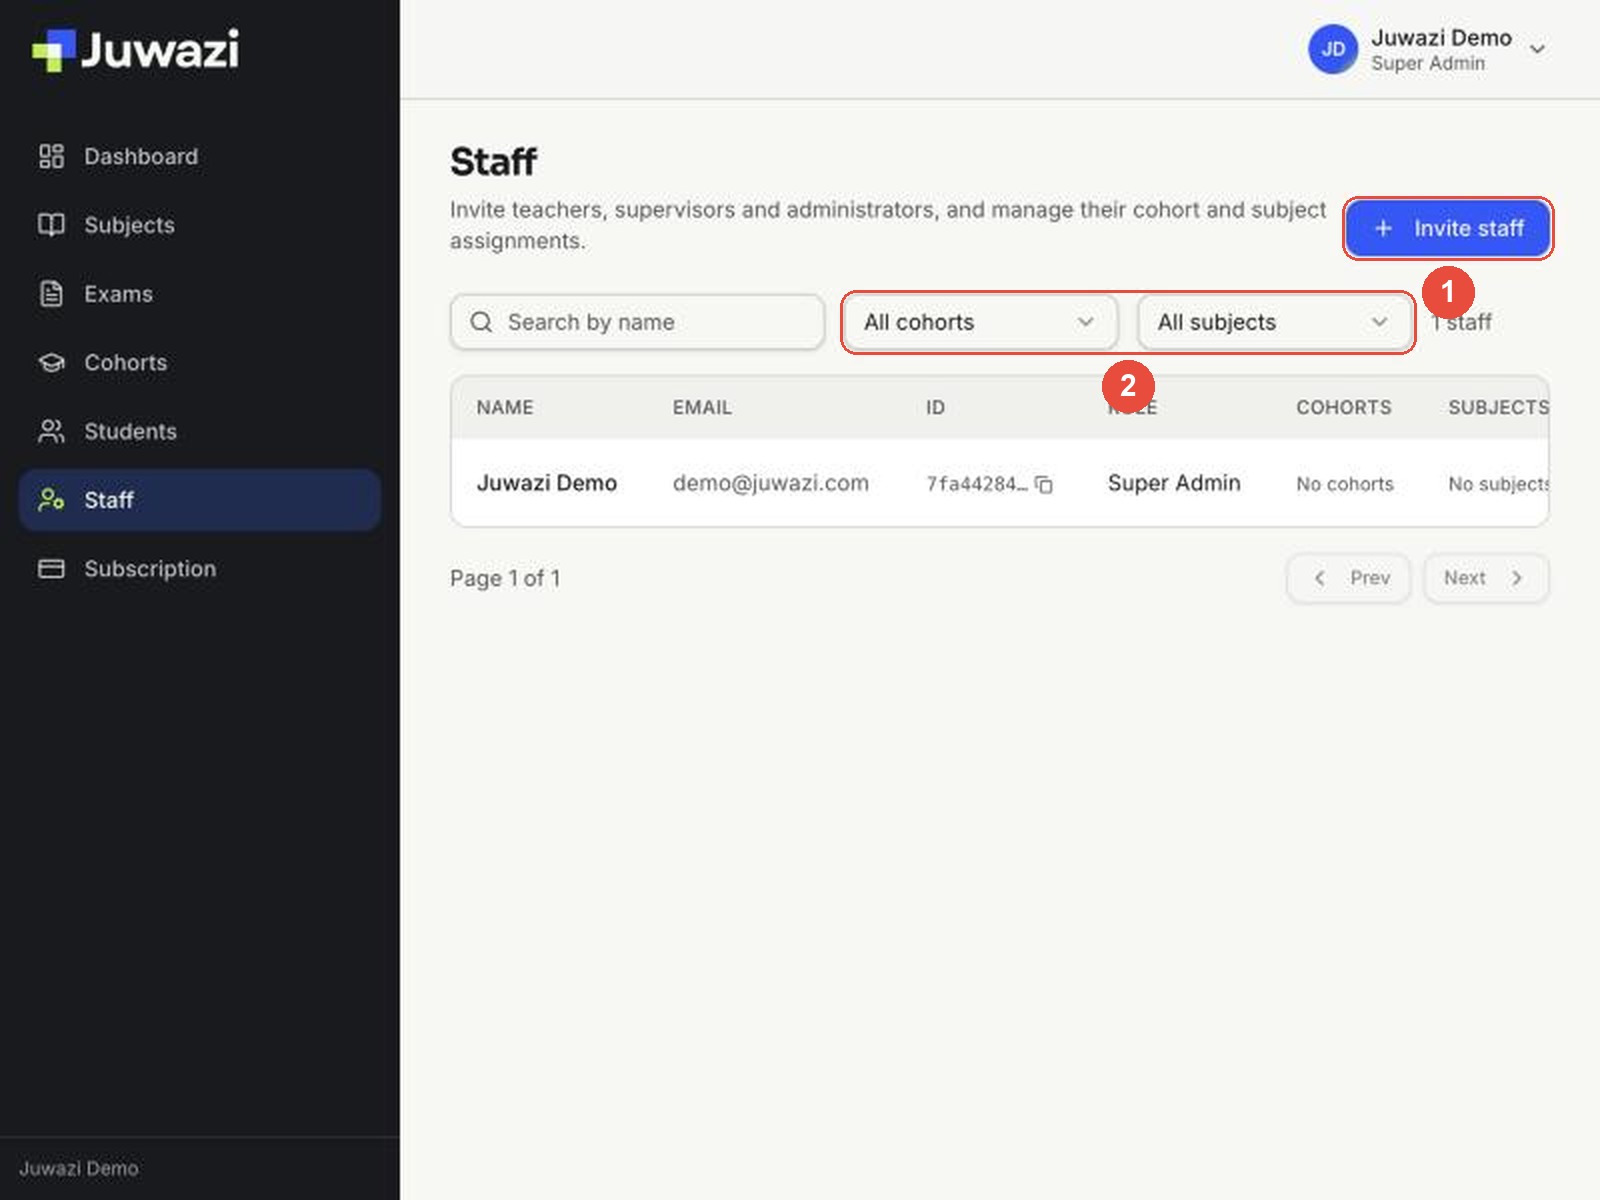
- In the sidebar, click Staff. At first you’re the only person listed.
- Click Invite staff (1). The filters (2) let you narrow the list by cohort or subject once you have more staff.
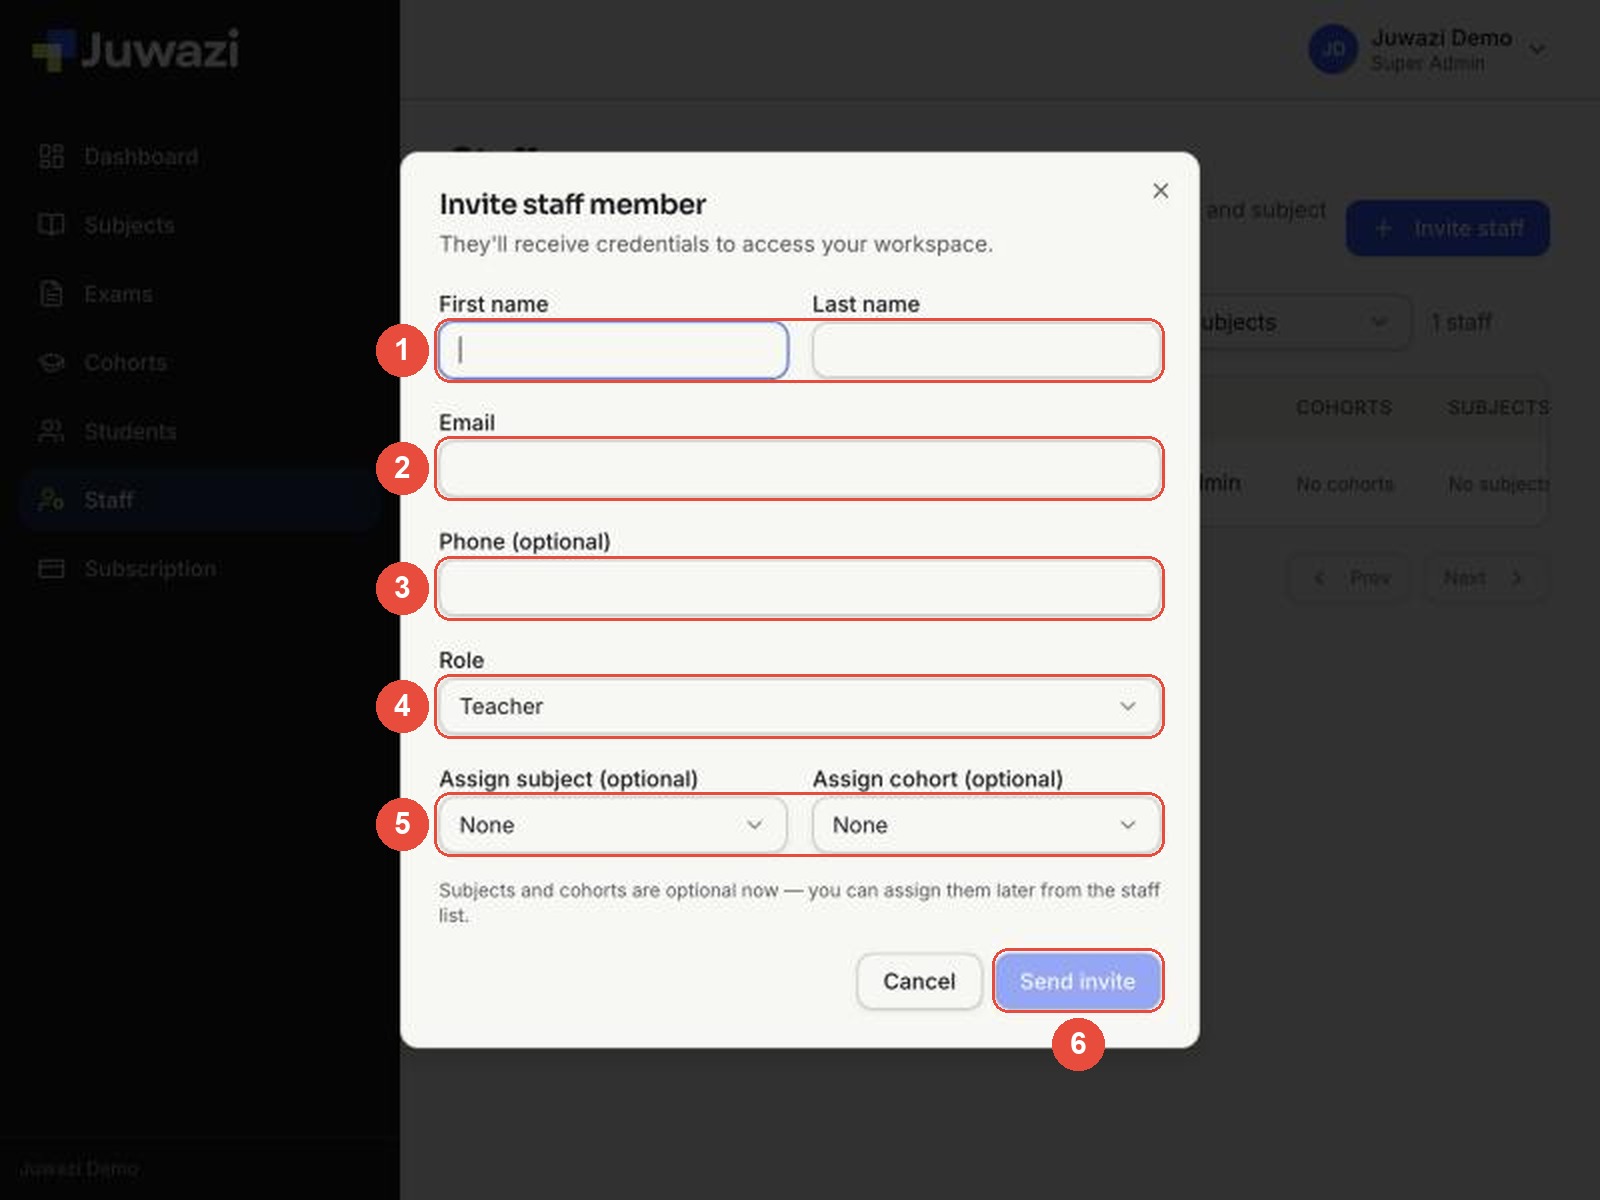
The Invite staff member form opens. It says “They’ll receive credentials to access your workspace.”
- First name and Last name
- Email – where the invite and sign-in details are sent. Double-check it.
- Phone (optional)
- Role – Teacher is selected by default.
- Assign subject and Assign cohort (both optional) – shown only for the Teacher and Staff roles. You can pick one of each here and add more later.
- Send invite – stays greyed out until the required fields are filled in.
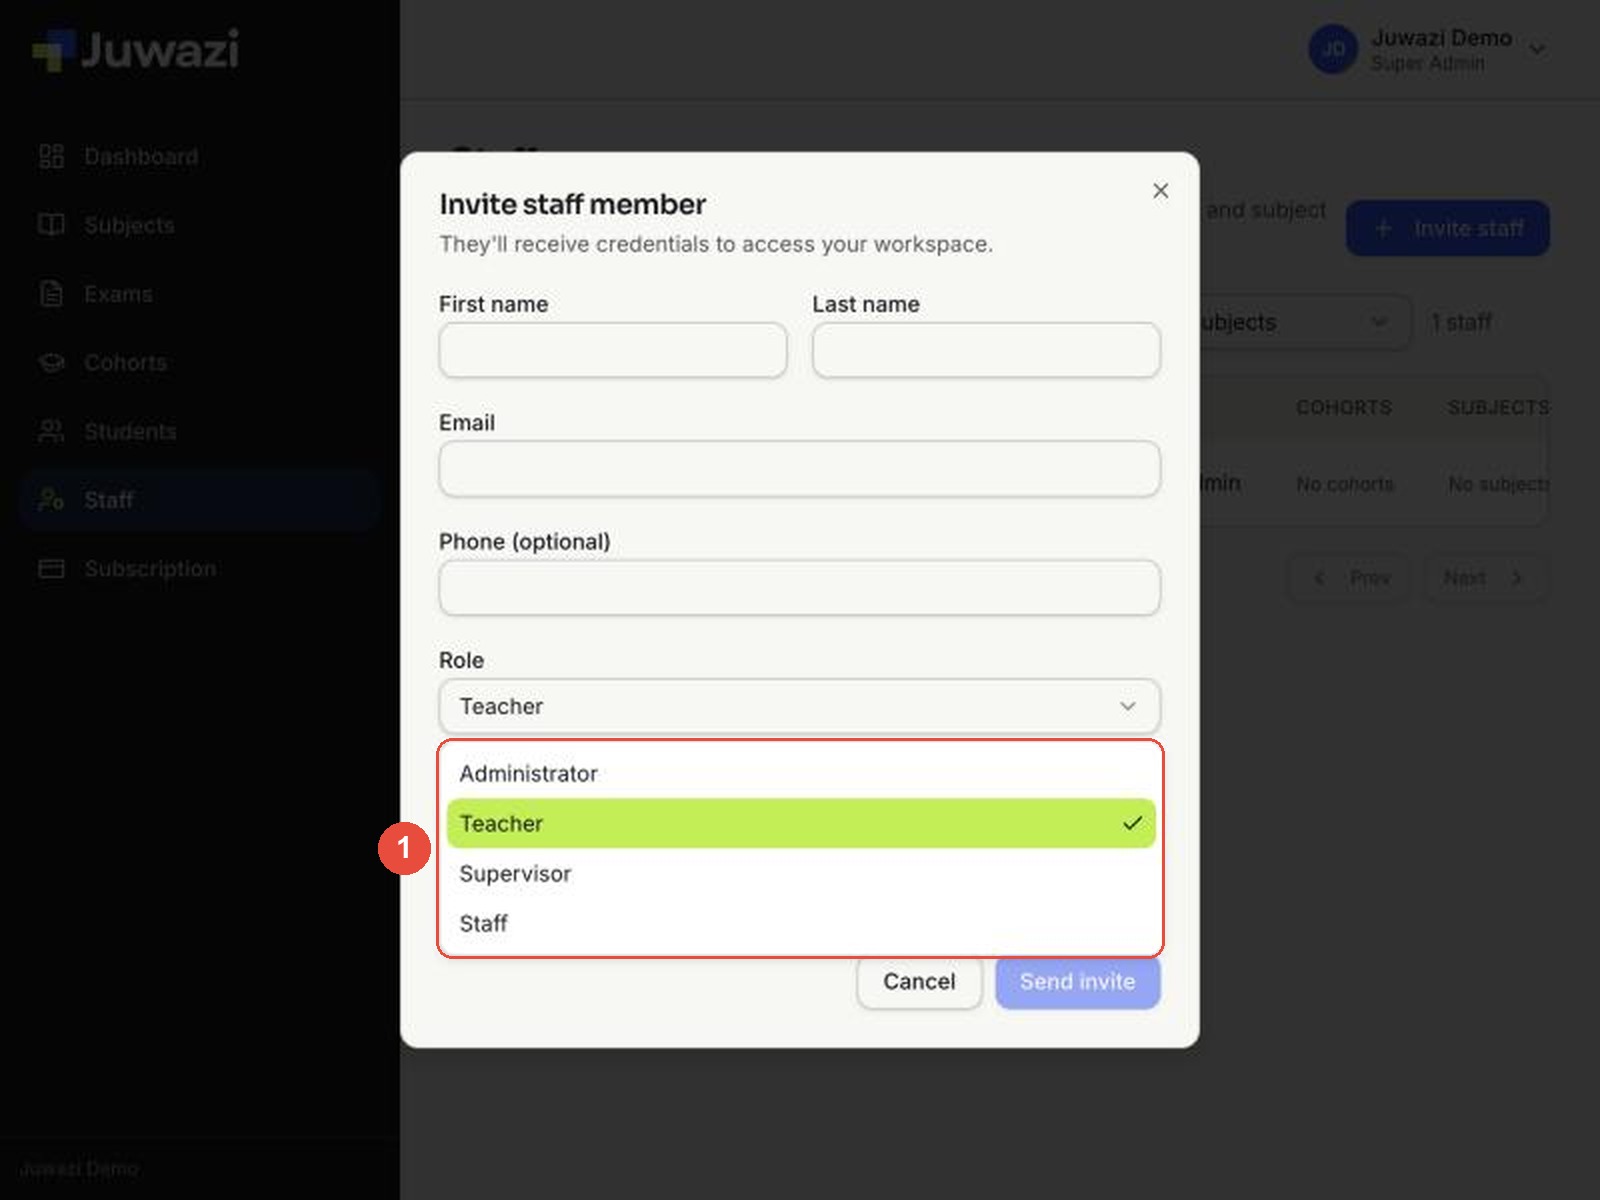
Open the Role list (1) to see the four roles:
Step 2: Invite each person#
Invite an Administrator#
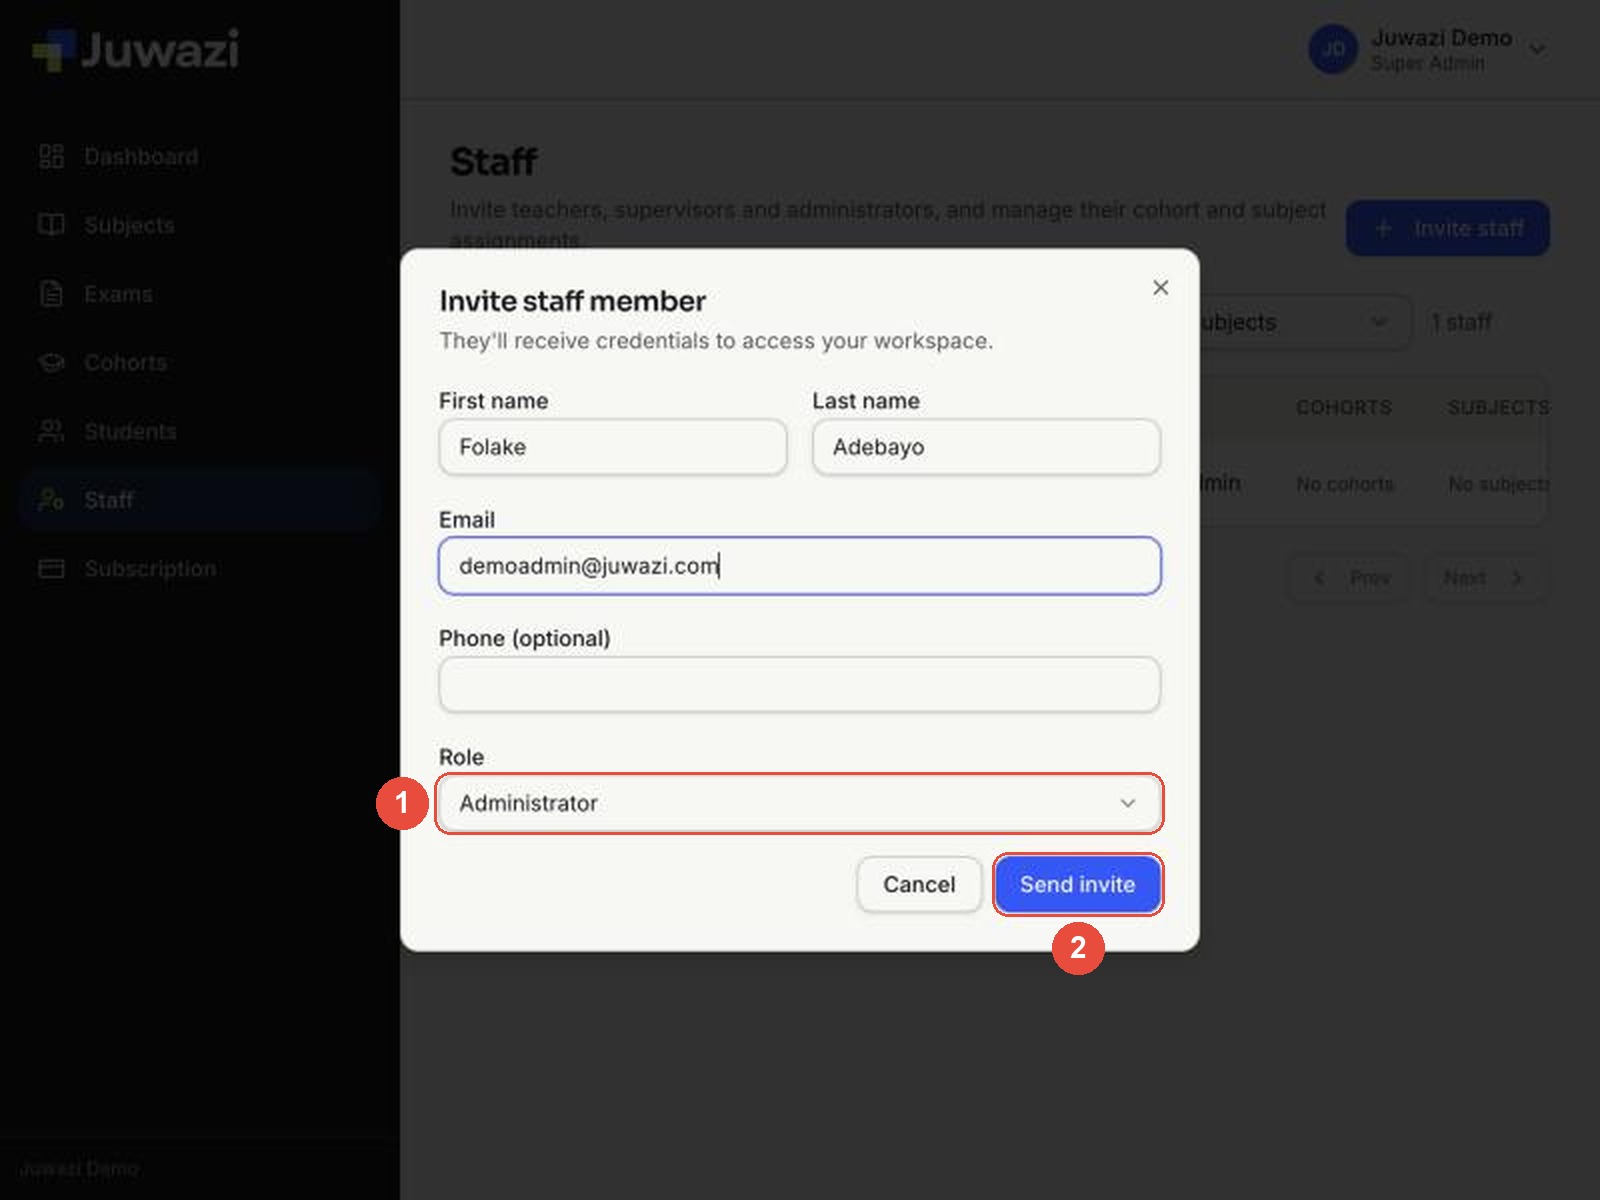
Choose the role first. When you pick Administrator, the subject and cohort fields disappear and the form gets shorter, so anything already typed into the lower fields moves position. Picking the role first avoids typing into the wrong box.
- Set Role to Administrator (1).
- Enter the first name, last name and email: Folake Adebayo, demoadmin@juwazi.com.
- Click Send invite (2).
After a few seconds a green banner appears (1): Invitation sent: Folake Adebayo, with Temporary password: sent via email. The new person is added to the list with their role (2).
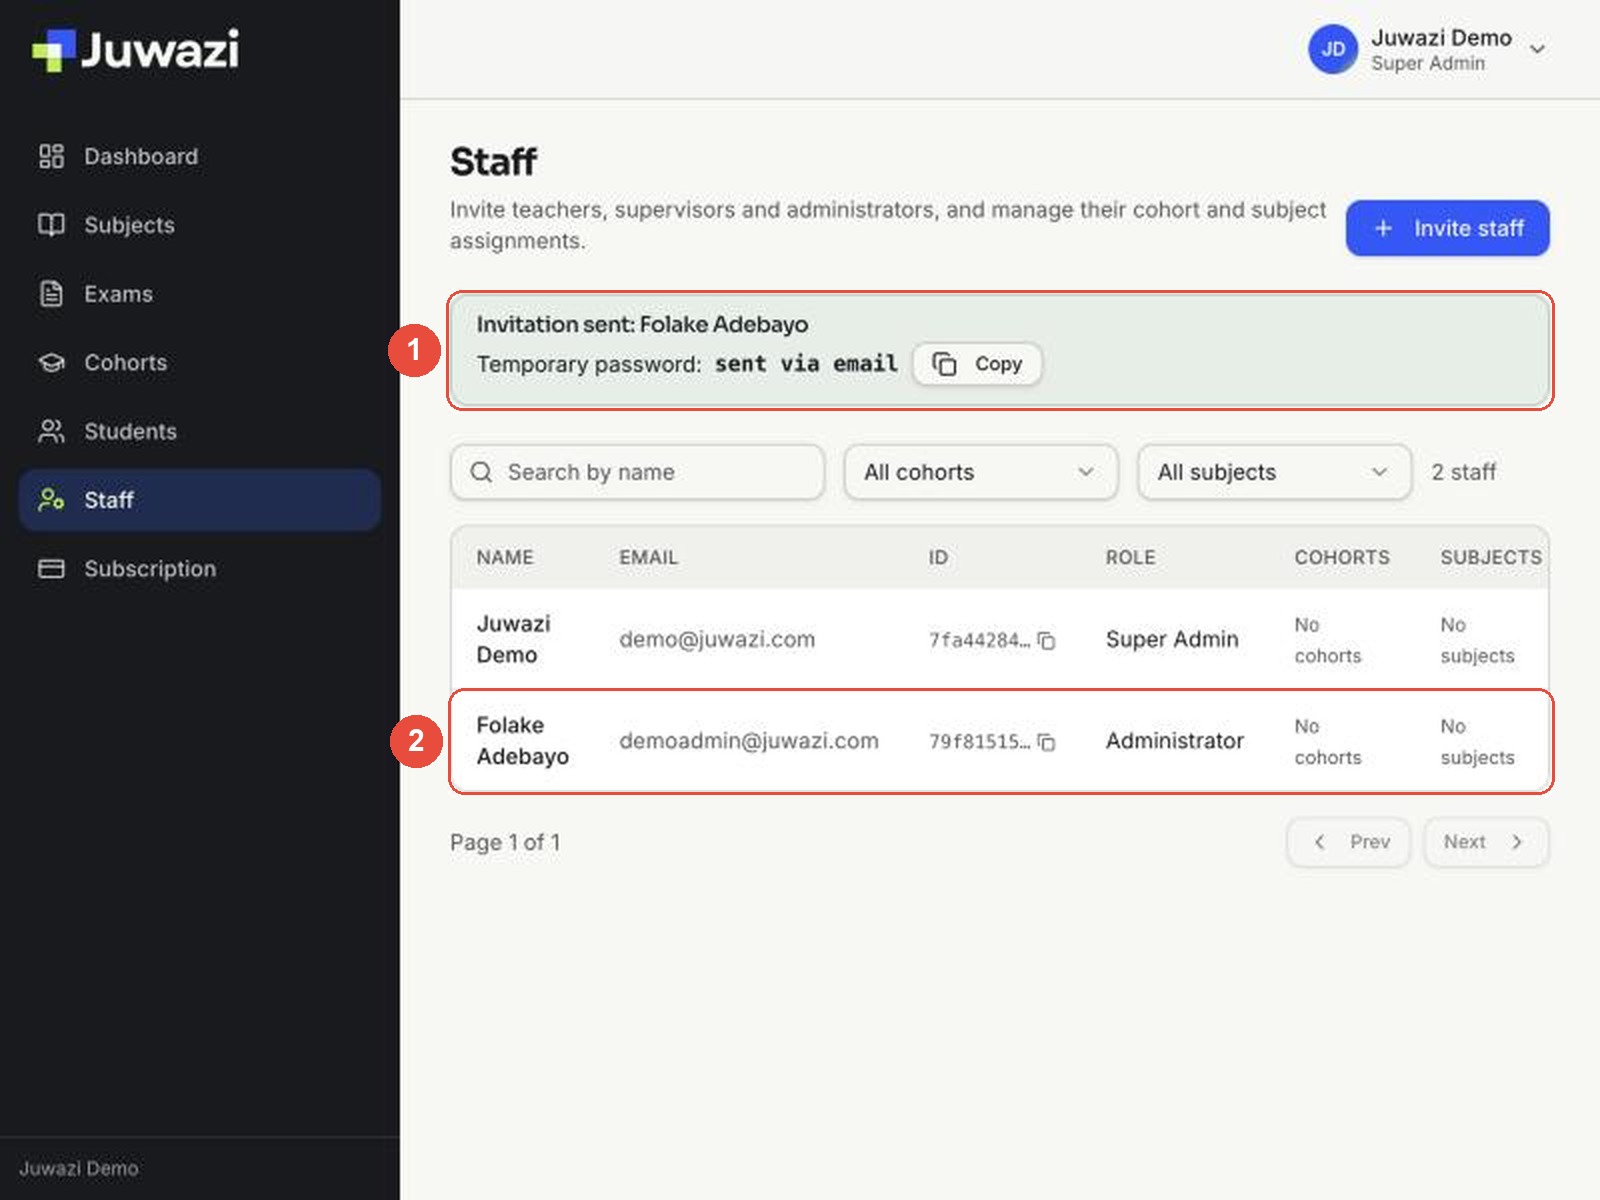
Juwazi never shows you the password. It goes only to the person’s email, so you don’t have to pass passwords around.
Invite a Teacher with a subject and a cohort#
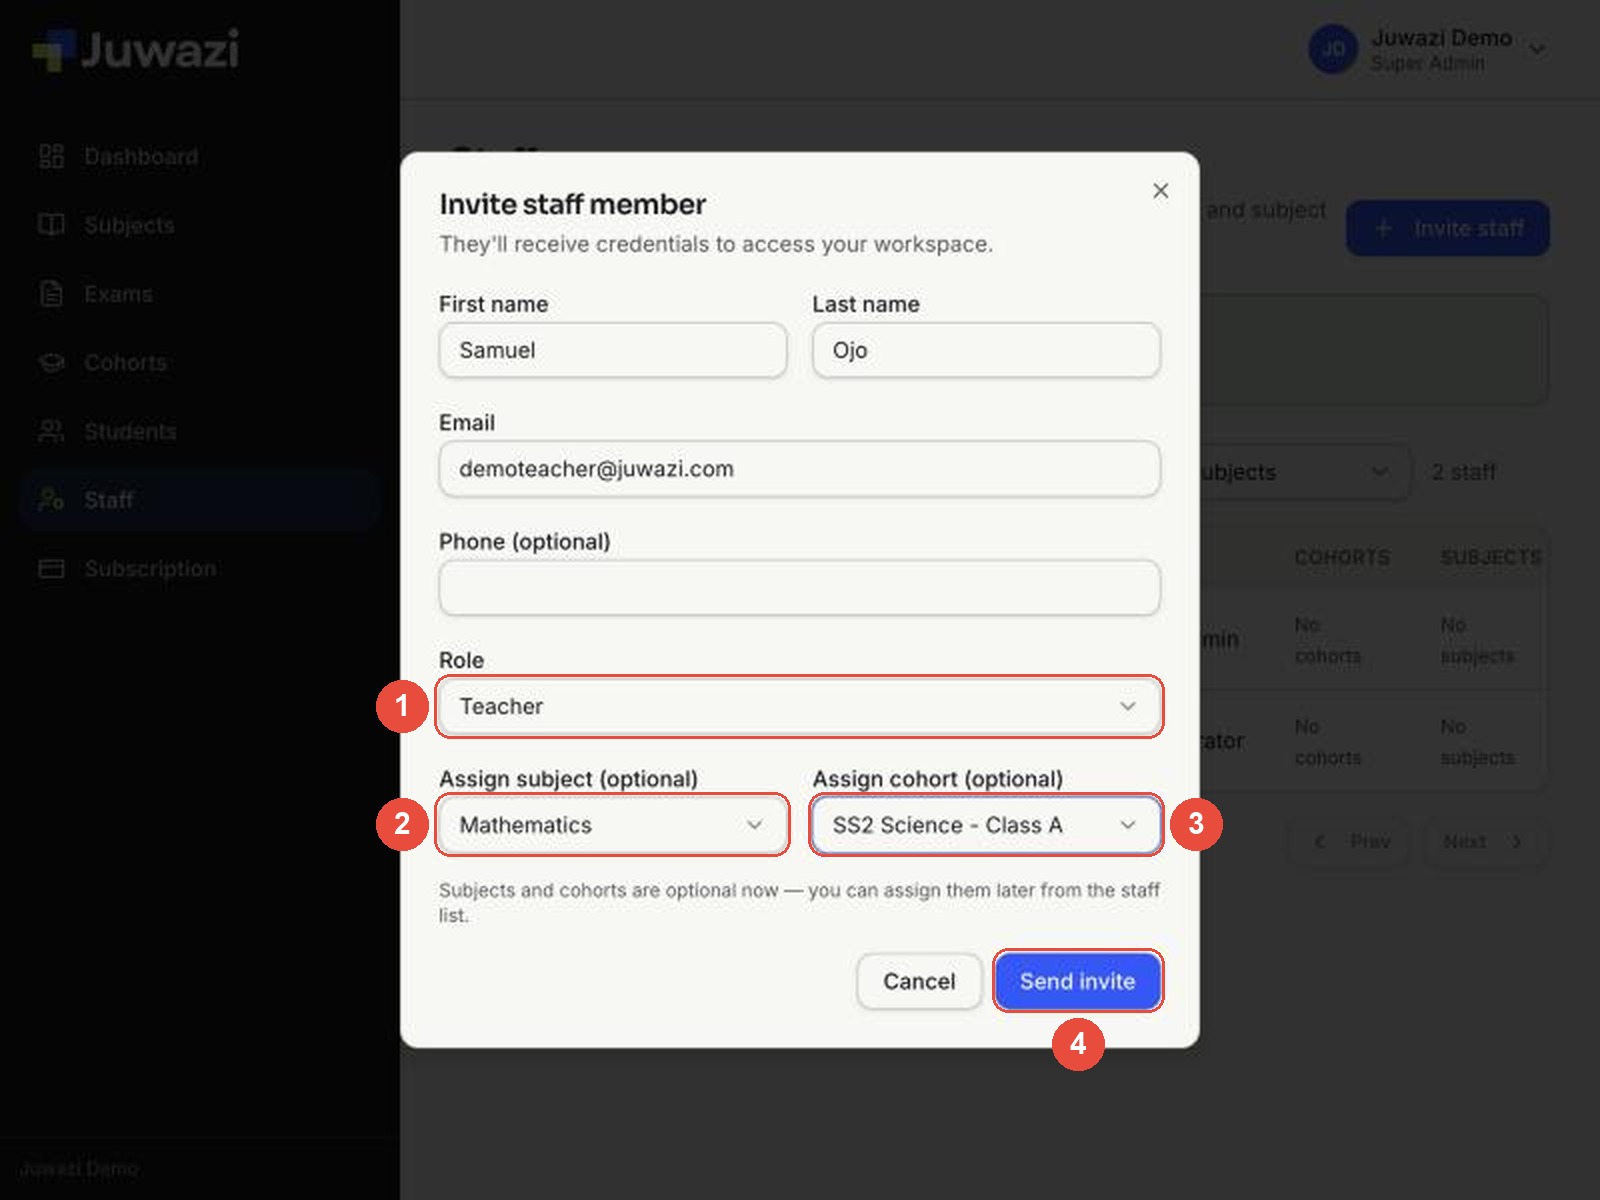
- Leave Role on Teacher (1).
- Enter the name and email: Samuel Ojo, demoteacher@juwazi.com.
- Assign subject (2): Mathematics. The list shows all your active subjects.
- Assign cohort (3): SS2 Science – Class A.
- Click Send invite (4).
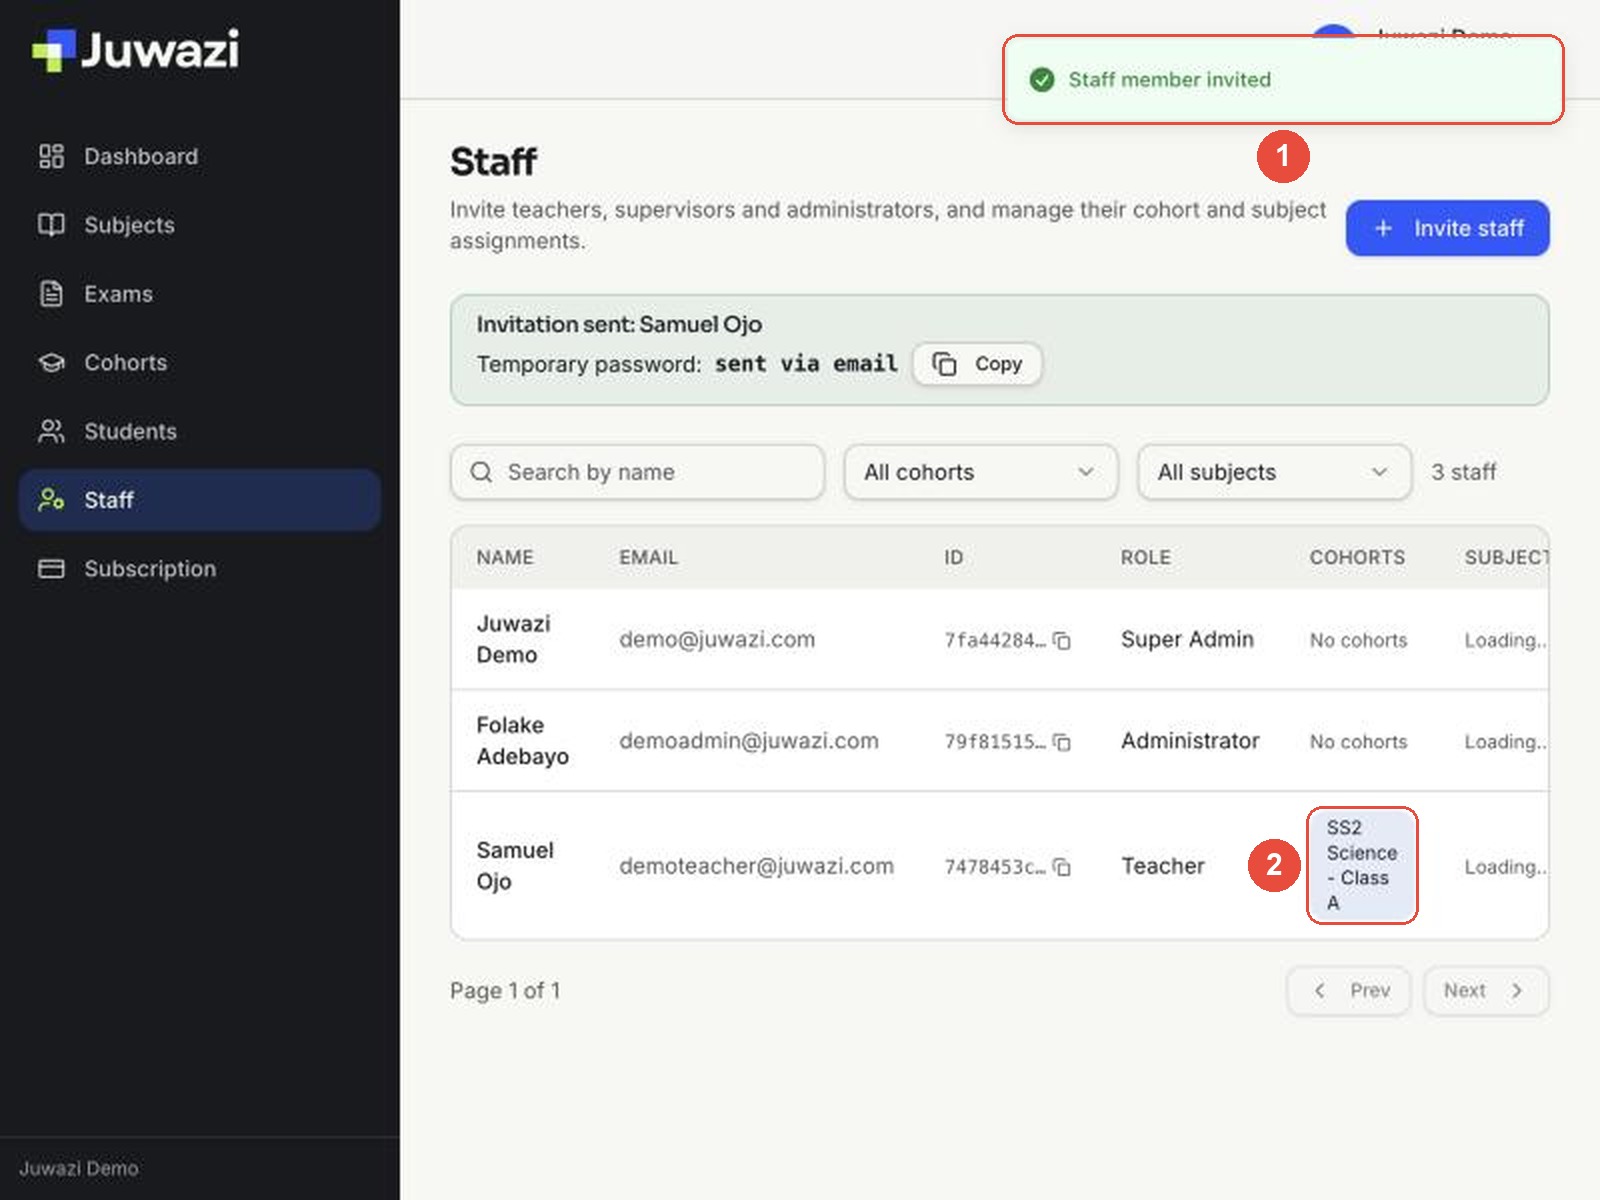
A Staff member invited message appears (1), and the new row already shows the cohort (2). The Subjects column says “Loading…” for a moment, then shows Mathematics.
Invite a Supervisor and a Staff member#
Repeat the same steps:
- Supervisor: Halima Yusuf, demosupervisor@juwazi.com. Like Administrator, this role has no subject or cohort fields in the form. Give the supervisor their cohort straight after inviting (Step 4).
- Staff: Peter Nnamdi, demostaff@juwazi.com. The subject and cohort fields appear; we left them on None.
The list now shows all five people and their roles (1). The Teacher and Supervisor are linked to SS2 Science – Class A (2).
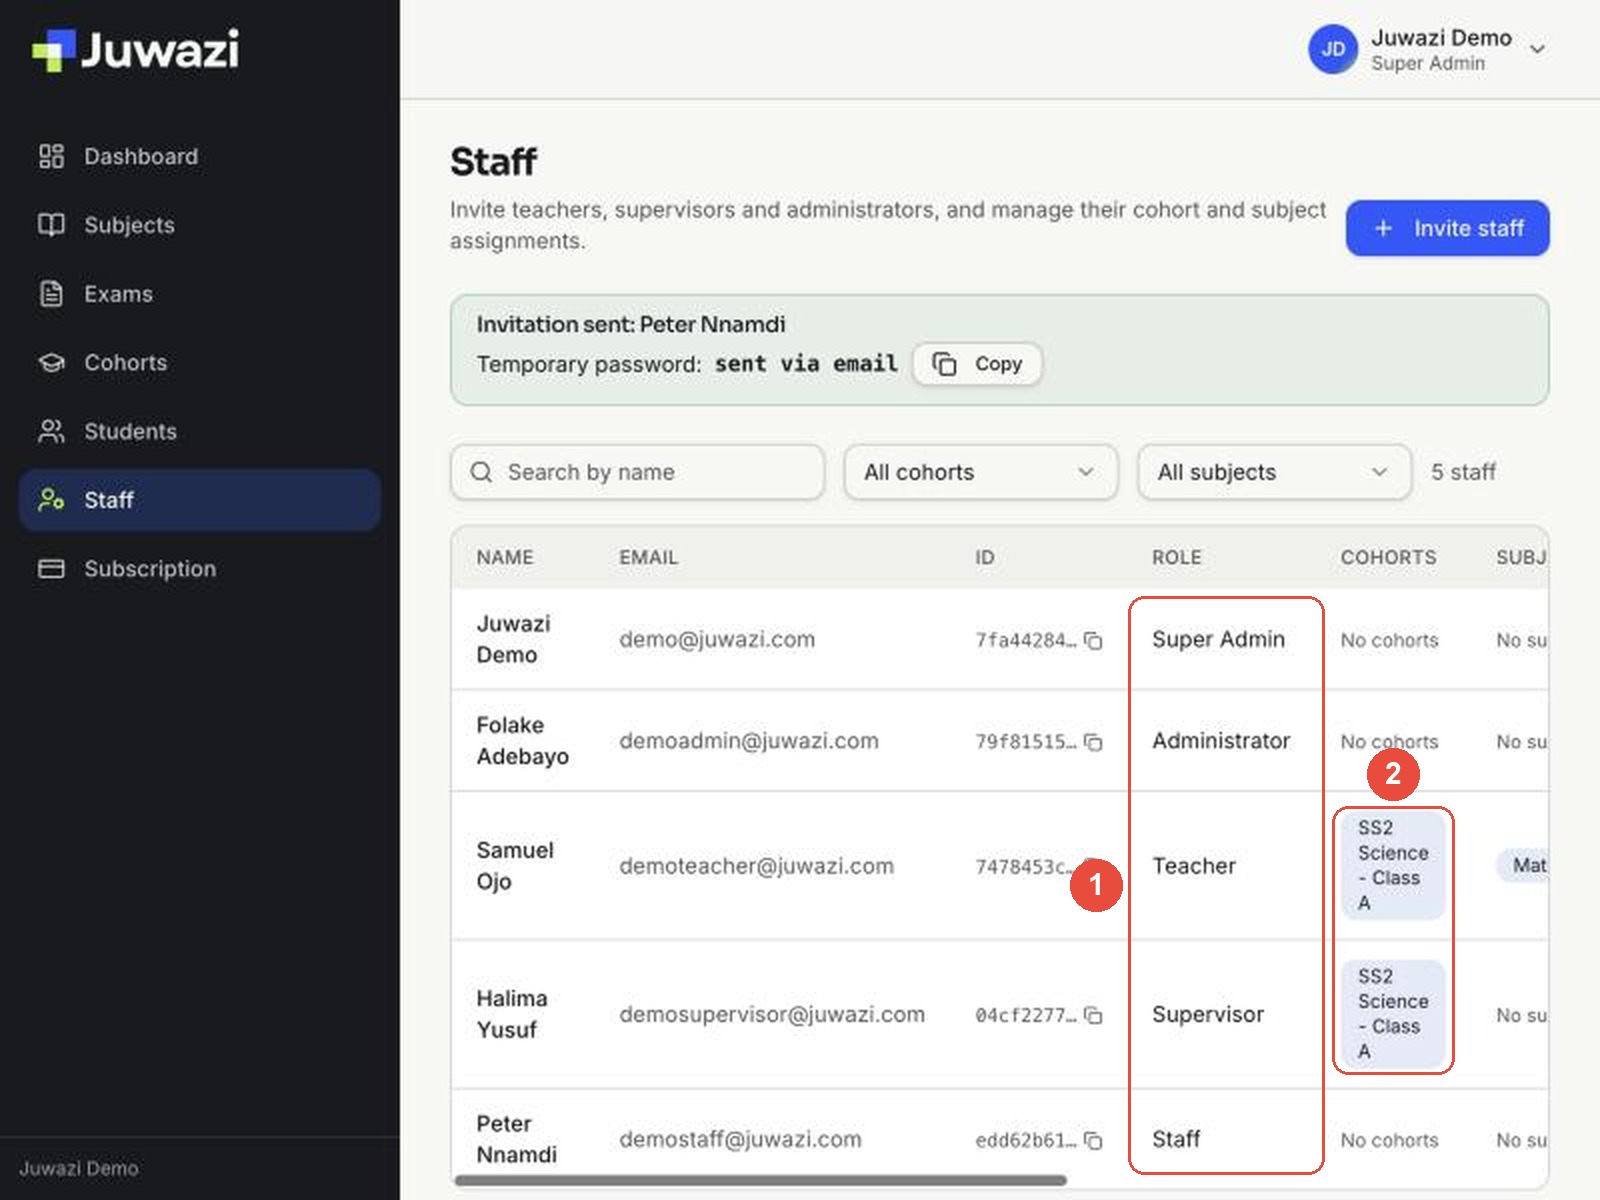
The list is wider than most laptop screens. Scroll it sideways to see the Subjects, Status and Actions columns.
Step 3: What the invited person receives#
- Juwazi sends an activation invite to the email address, with a temporary password.
- The person goes to the Juwazi sign-in page (app.juwazi.com/login) and signs in with their email and that password.
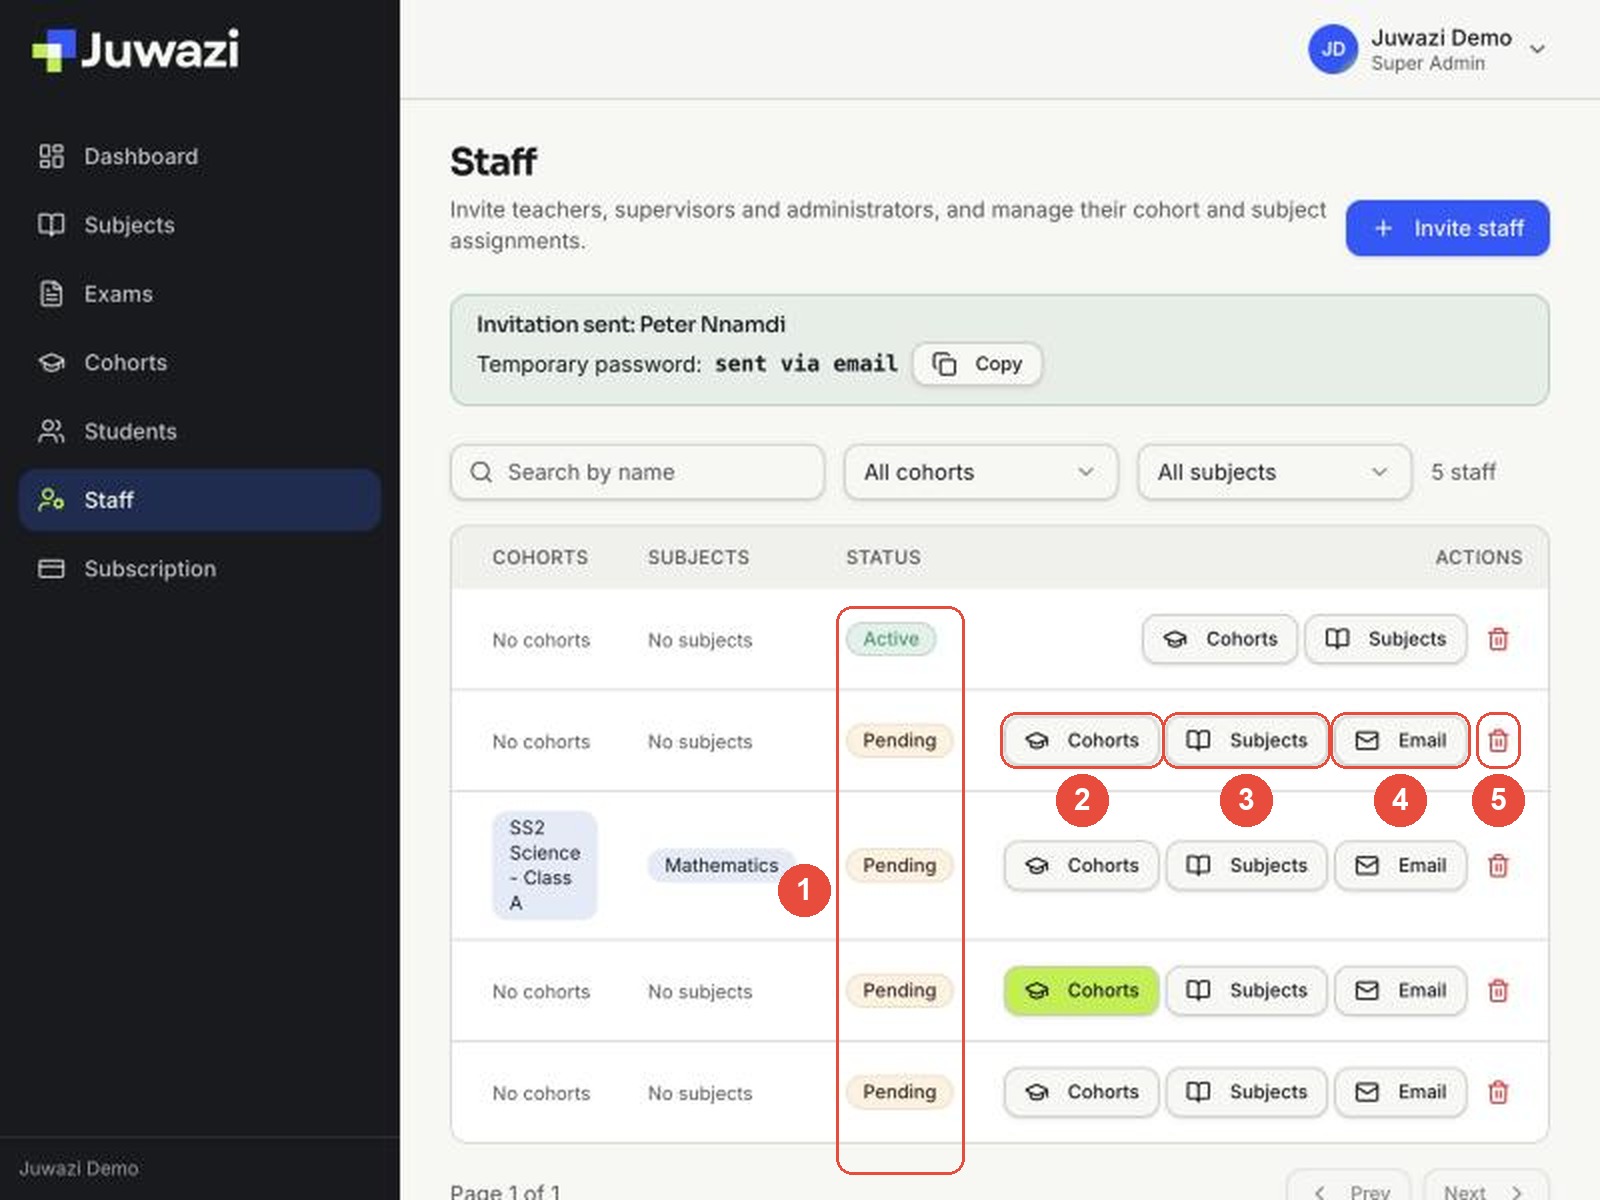
- Until they activate their account, their Status on the Staff page is Pending (1). Your own Super Admin account shows Active.
Each row also has action buttons: Cohorts (2), Subjects (3), Email (4) and the red bin, Remove staff member (5). The Email button appears only for people who are still Pending.
If the invite went to the wrong address, or never arrived#
Click Email on that person’s row. The Update email window opens. Correct the address (1) and click Save & resend invite (2). Juwazi sends a fresh activation invite to the new address.
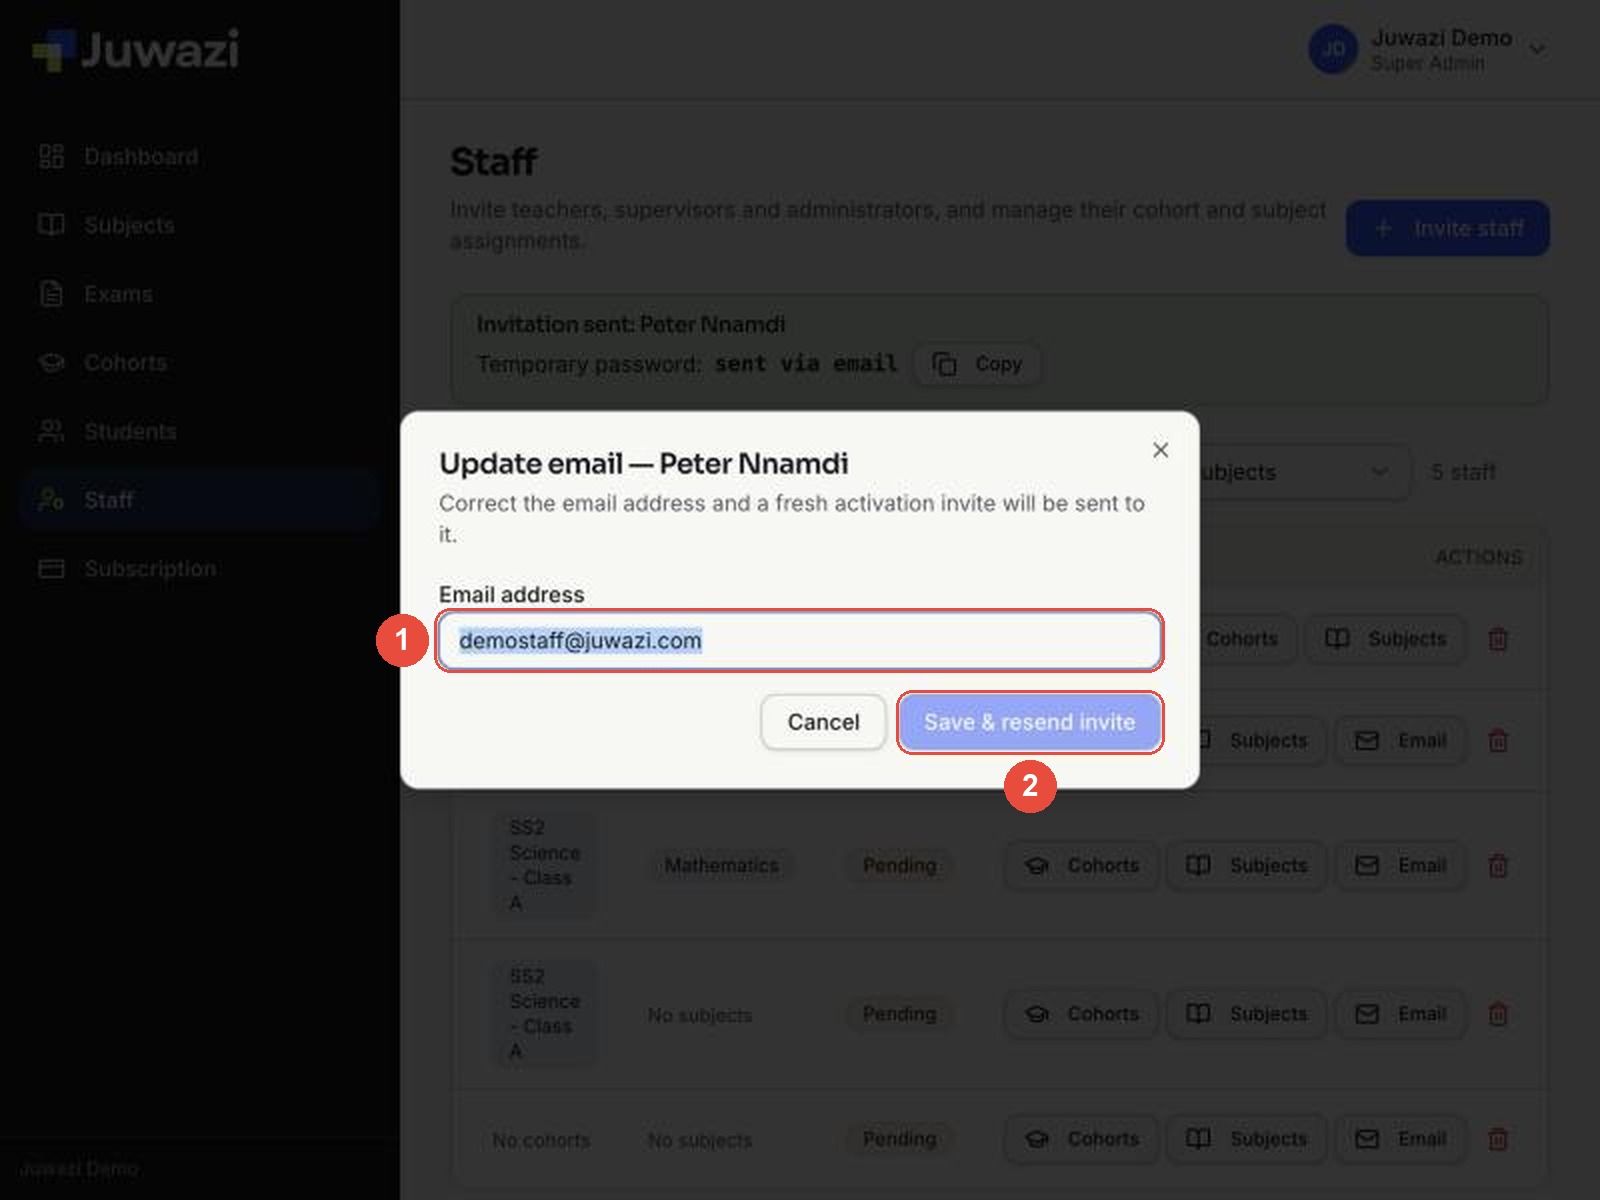
Save & resend invite stays greyed out until you change the address. To resend to the same address, there’s no button. Ask the person to check their spam or junk folder first.
What the invite email looks like and the first-sign-in screens are covered in the Administrator, Teacher, Supervisor and Staff guides, once each person has signed in.
Step 4: Manage cohort and subject assignments#
You can change what someone is assigned to at any time, whether they’re Pending or Active. People can have several cohorts and subjects.
Add or remove cohorts#
- On the person’s row, click Cohorts. Here we give Halima, the Supervisor, a class to oversee.
- Choose a cohort in Add to cohort (1), here SS2 Science – Class A.
- Click Add cohort (2). An Added to cohort message appears and the Cohorts column in the list updates.
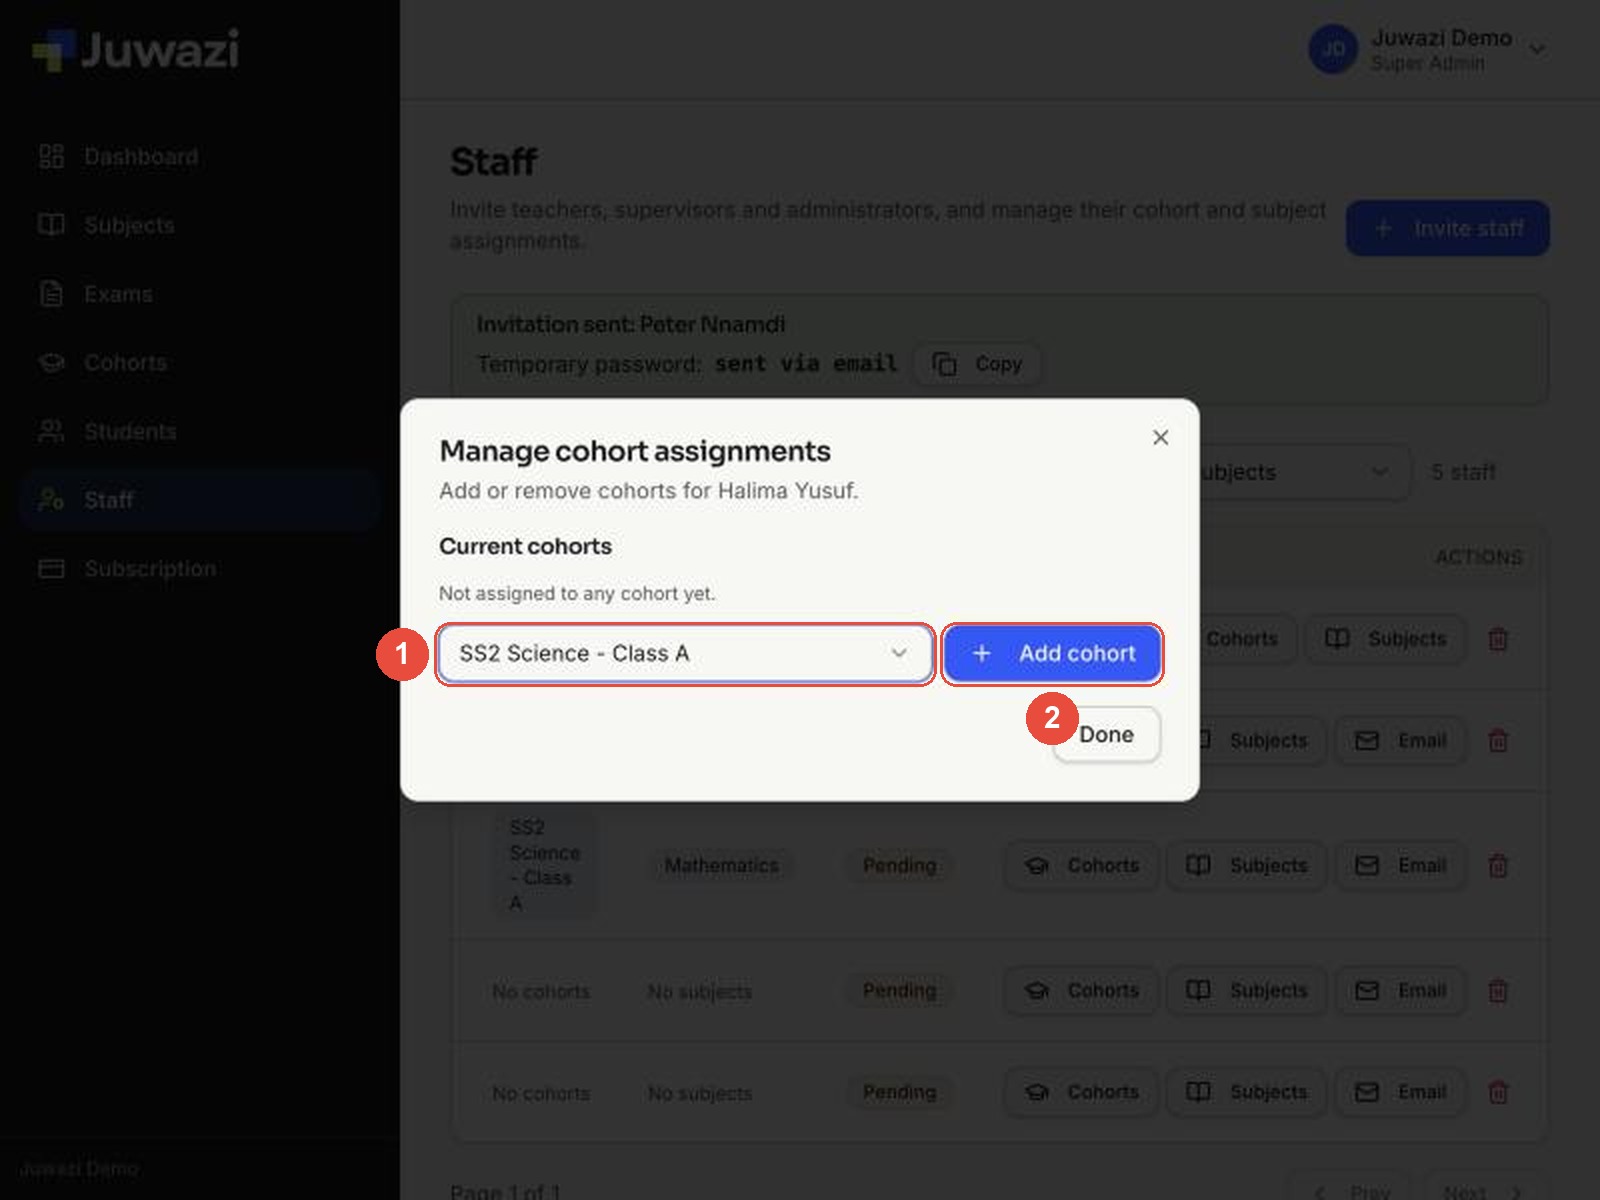
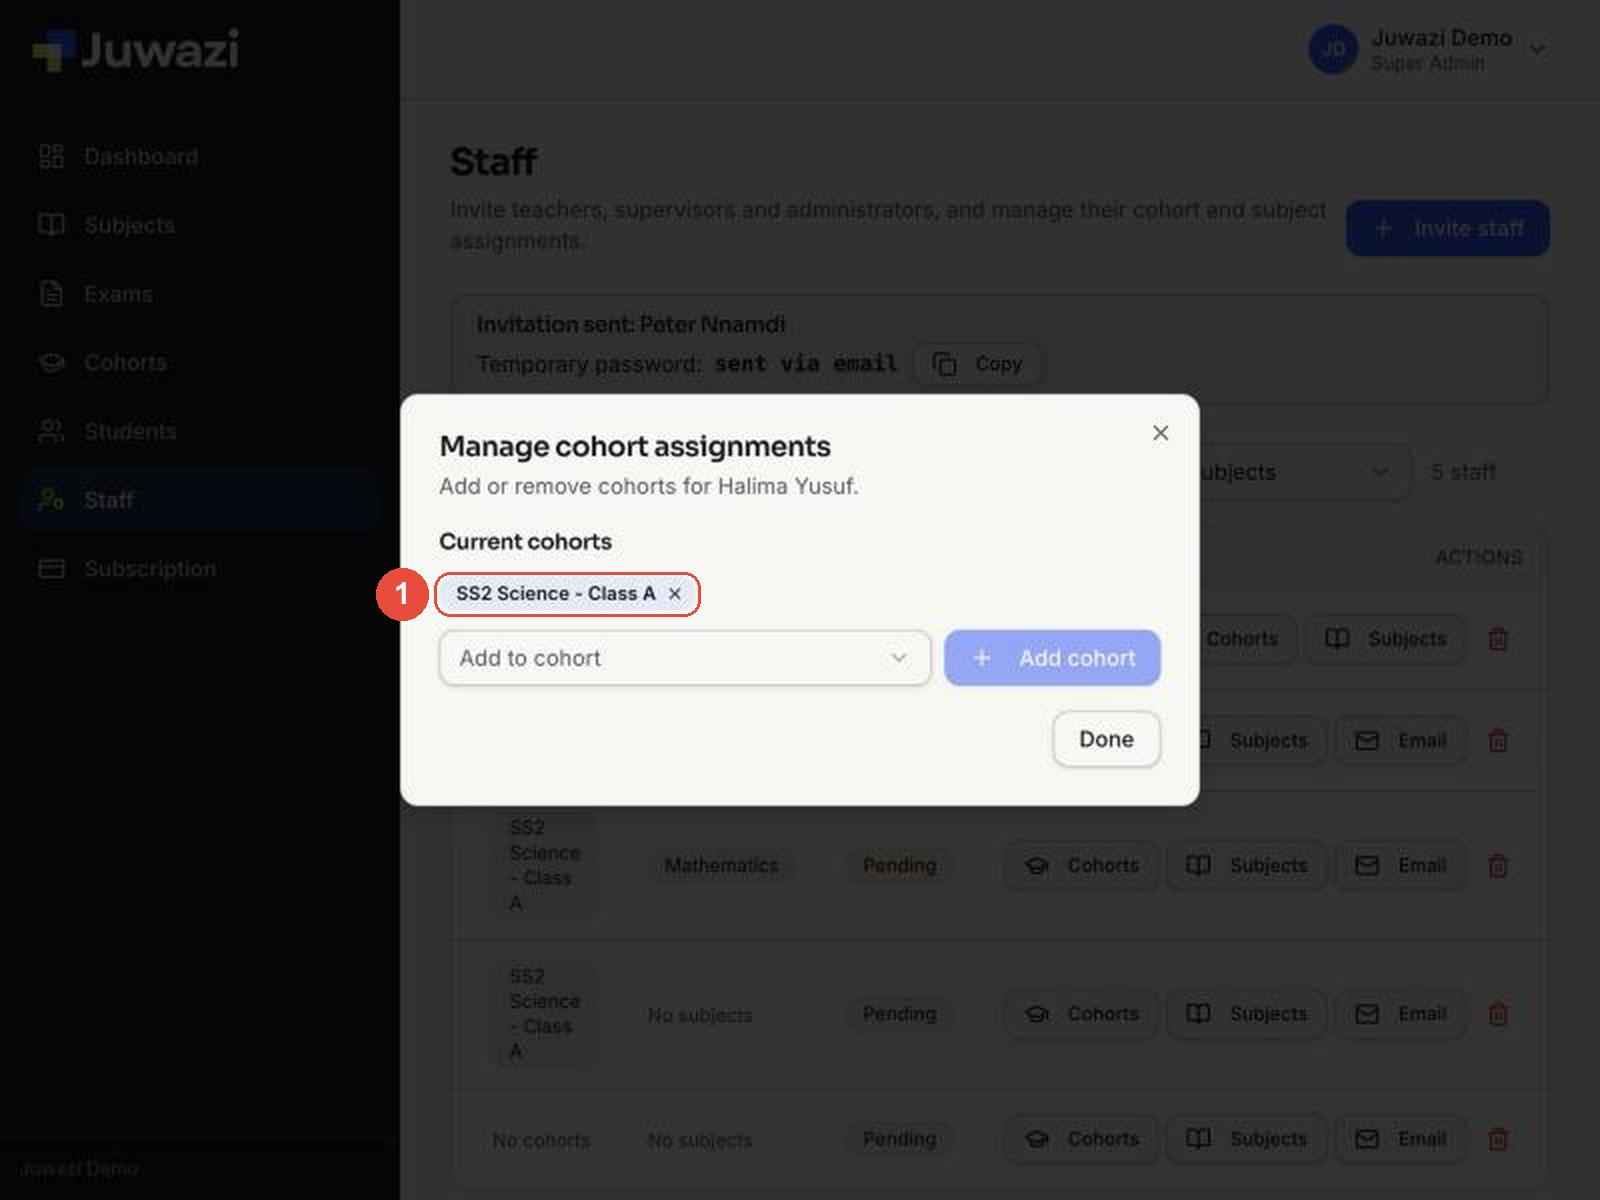
The window doesn’t refresh straight away: it can still say “Not assigned to any cohort yet” after you add one. Click Done and open it again. The cohort now shows as a chip under Current cohorts (1). Click the × on a chip to remove that cohort.
Add or remove subjects#
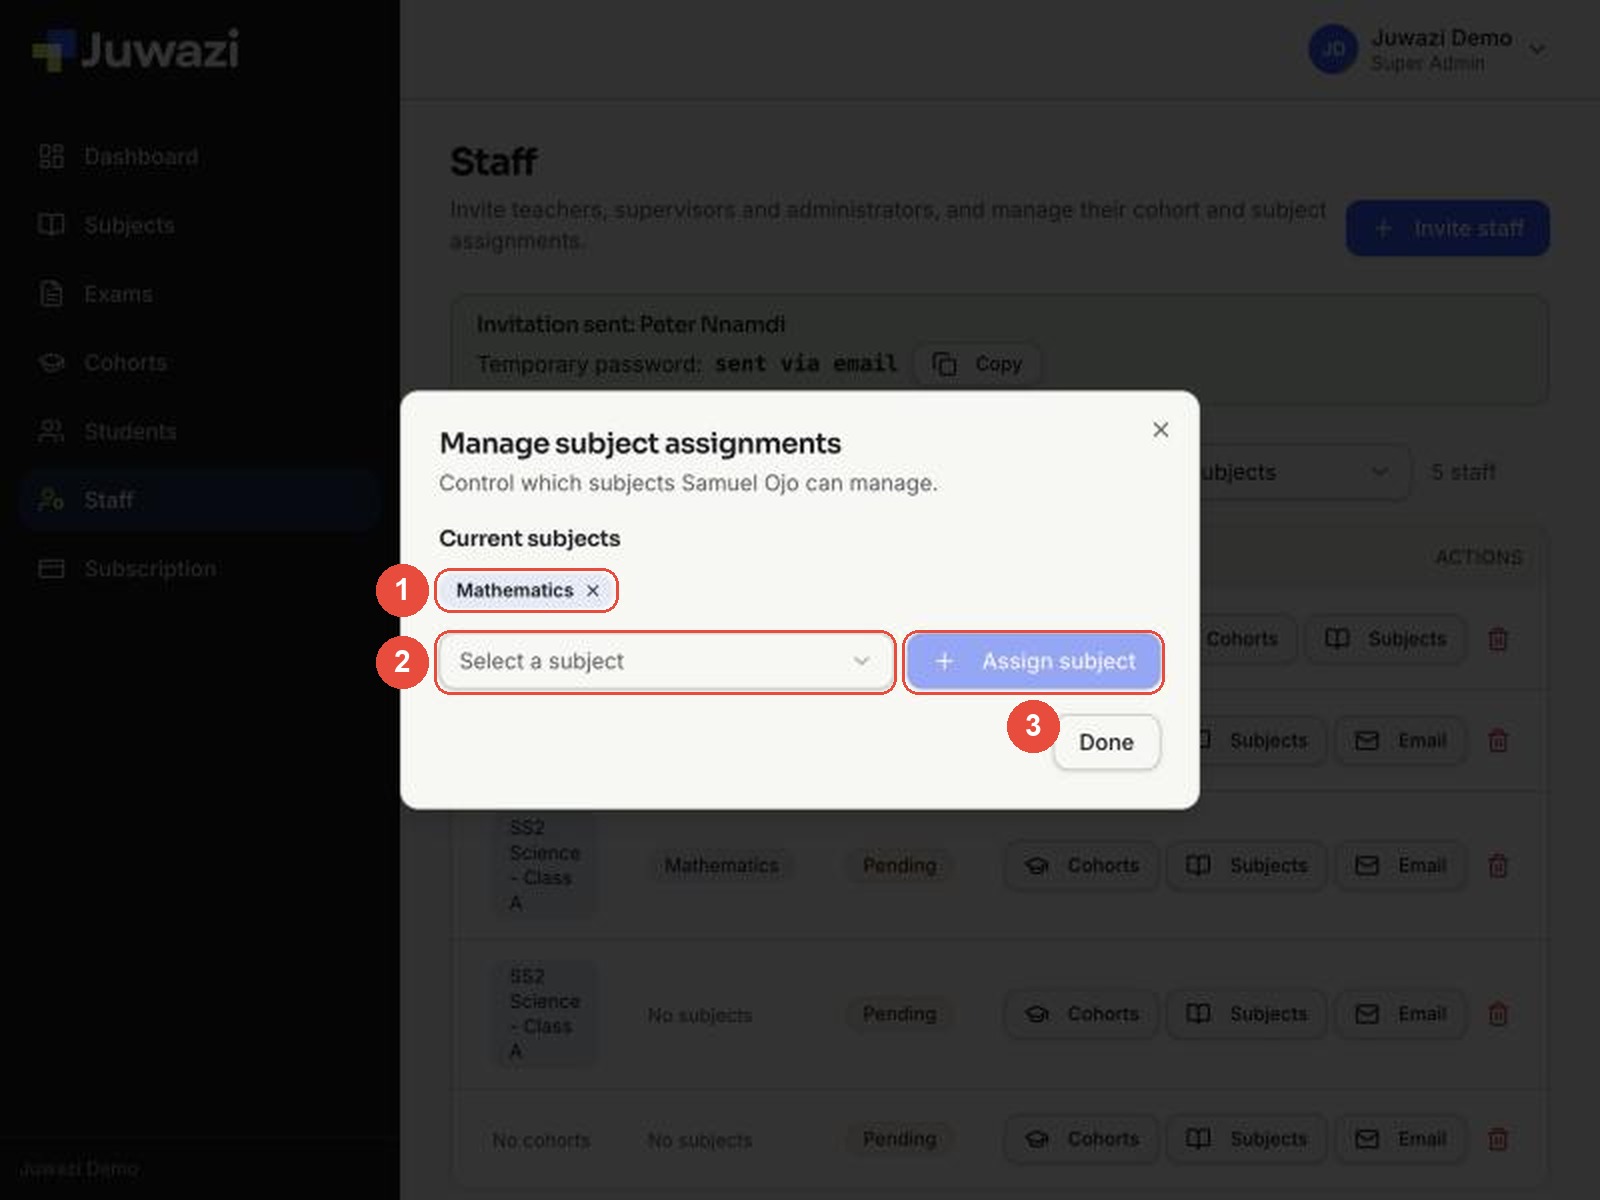
Click Subjects on the row. The window works the same way:
- Current subjects – each assigned subject shows as a chip with an × to remove it. Samuel already has Mathematics from his invite.
- Select a subject – pick another subject.
- Assign subject – adds it.
You can also give teachers a cohort from the cohort’s own page (Cohorts → open the cohort → Teachers → Assign teacher, Guide 7). It’s the same assignment seen from the other side.
Step 5: Remove a staff member#
When someone leaves, click the red bin at the end of their row (Remove staff member). Your own Super Admin row also has a bin, so make sure you’re on the right row.
We didn’t remove anyone while writing this guide. Before you use it on a real account, check what happens to the exams and questions that person created. Check too whether a confirmation step appears, and whether they can be invited again later with the same email.
If you only need to change what someone works on, use Cohorts or Subjects (Step 4) instead of removing them.
Tips and good practice#
- Pick the role before typing. Switching to Administrator or Supervisor changes the form’s layout.
- Give each person the least access they need. Make someone an Administrator only if they should approve exams. Most subject teachers should be Teachers.
- Assign subjects and cohorts straight away. A Teacher or Supervisor with no assignments has little to work with when they first sign in.
- Use work email addresses that the person checks. The temporary password is sent only by email.
- Watch the Status column. If someone stays Pending for days, they probably haven’t found the invite. Ask them to check spam, or fix the address with Email.
- Ignore the Copy button on the green banner. The password is never shown there, so there’s nothing for you to copy or share.
- Use the cohort and subject filters above the list to see who is linked to a class or subject.
Next: the Administrator guide, starting with signing in as an Administrator.